
Installing a rear facing infant car seat might seem tricky at first, but it’s one of the most important steps to keep your baby safe on the road. You want to protect your little one from the moment you start driving, and doing it right makes all the difference.
This guide will walk you through simple, clear steps so you can feel confident every time you buckle your baby in. Keep reading to learn how to install your infant car seat quickly and securely, giving you peace of mind on every trip.

Credit: safety1st.com
Choosing The Right Car Seat
Choosing the right car seat is key for your infant’s safety. A good seat fits your baby well and meets safety rules. It also makes travel comfortable for your little one. Take your time to pick the best one for your child.
Check Weight And Height Limits
Every car seat has weight and height limits. These limits show if the seat fits your baby. Choose a seat that matches your infant’s current size. This ensures safety and proper support. Use the car seat manual to find these limits.
Select Approved Models
Pick car seats approved by safety authorities. Look for labels that show safety certification. Approved seats pass strict crash tests. They protect your baby better. Avoid seats without clear safety approval marks.
Consider Infant Comfort
Comfort is important for your baby on trips. Choose seats with soft padding and good support. Check if the seat has adjustable straps and headrests. Proper comfort helps your infant stay calm and happy. It also makes car rides easier for parents.
Preparing Your Vehicle
Preparing your vehicle is the first step in installing a rear facing infant car seat. This step ensures safety and makes installation easier. Knowing your car’s layout helps place the seat correctly. Taking time now prevents problems later.
Locate The Rear Seat
Find the back seat in your vehicle. Most infant seats go in the rear middle or side seats. Choose a spot with enough space. The seat should face the rear of the car. Avoid the front seat for better safety.
Identify Latch Anchors And Seat Belts
Look for LATCH anchors in the rear seat. These metal bars help secure the car seat. If your car lacks LATCH, use the seat belts. Check the car manual for exact anchor locations. Use the method that fits your car and seat best.
Clear The Installation Area
Remove any items from the rear seat. Clear toys, bags, or loose objects. A clean area allows proper car seat fitting. It also avoids distractions during driving. Keep the space tidy for safety and comfort.
Installing The Base
Installing the base of a rear-facing infant car seat is the first important step. A properly installed base keeps your baby safe during every ride. Follow these simple steps to set up the base correctly and securely.
Position The Base Correctly
Place the base on the vehicle seat. Make sure it sits flat and does not move side to side. The base should face the back of the car. Check the angle indicator on the base to ensure the correct recline. A good angle helps protect your baby’s head and neck.
Use Latch System Or Seat Belt
Choose either the LATCH system or the seat belt to secure the base. Locate the lower anchors or seat belt path on your vehicle. Connect the LATCH straps tightly or thread the seat belt through the base. Tighten until the base does not move more than one inch side to side.
Check For Secure Fit
Test the base by pushing and pulling it firmly. It should not shift more than one inch in any direction. Double-check the angle indicator again. Make sure the base is stable before attaching the car seat. A secure base gives the best protection for your infant.
Credit: www.tinyhood.com
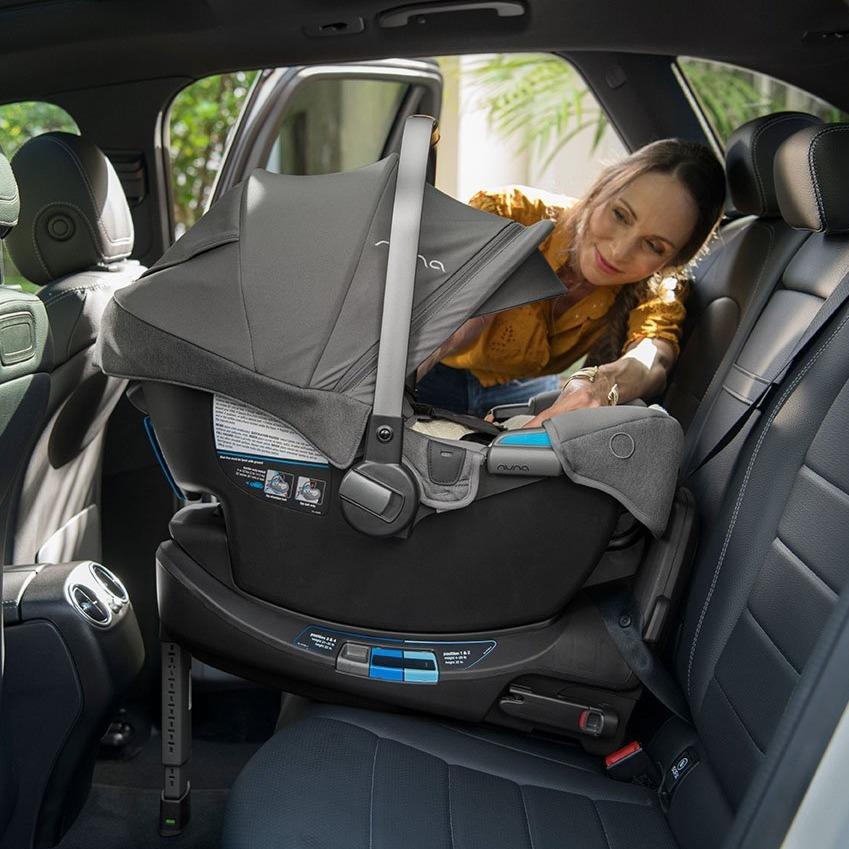
Attaching The Infant Carrier
Attaching the infant carrier to the car seat base is a key step for safety. This process ensures the seat stays secure during travel. Follow simple steps to connect the carrier firmly and correctly. Taking time here helps protect your baby on every trip.
Align Carrier With Base
Place the infant carrier directly above the base. Check that the carrier’s connectors line up with the base’s slots. Hold the carrier steady and ready for attachment. Proper alignment makes locking easier and safer.
Click And Lock Securely
Lower the carrier onto the base firmly. Listen for a clear click sound. This means the carrier locked into place. Press down gently to confirm it does not move. The click ensures the carrier is safely attached.
Verify Connection
Pull up slightly on the carrier to test the lock. The carrier should stay fixed and not lift off. Look for any indicators on the base showing a secure fit. Double-checking gives peace of mind before every ride.
Adjusting The Harness
Adjusting the harness on a rear-facing infant car seat is key for your baby’s safety. The harness keeps your infant secure during every ride. Proper adjustment helps protect your child from sudden stops or turns. Follow these steps to make sure the harness fits perfectly.
Place Infant Properly
First, place your baby in the car seat. Make sure their back and bottom sit flat against the seat. The infant’s head should rest comfortably without slouching. Position the shoulder straps at or below your baby’s shoulders. This ensures the harness fits correctly and supports your child well.
Tighten Straps
Next, pull the harness straps to tighten. The straps should lie flat without twists or slack. Pull firmly but gently, so the harness holds your baby snugly. Check the chest clip and slide it to armpit level. This keeps the straps in the right place across the chest.
Ensure Snug Fit
Check the harness fit by doing the pinch test. Try to pinch the strap at the shoulder. If you can pinch any excess webbing, tighten the straps more. The harness should feel snug but not uncomfortable. A well-adjusted harness protects your infant in every car ride.
Final Safety Checks
Final safety checks are crucial for your infant’s car seat. These checks help ensure the seat is secure and your baby is safe. Taking the time to review every detail can prevent accidents and give you peace of mind.
Test Stability
Push the car seat at the base near the vehicle seat. It should not move more than one inch side to side or front to back. A loose seat can endanger your child. Keep tightening the straps until the seat is firmly in place.
Check Recline Angle
Look at the car seat’s recline indicator. The angle should match the manufacturer’s recommendation. A proper recline keeps your baby’s airway open and comfortable. Adjust the seat angle if it is too upright or too flat.
Review Manufacturer Guidelines
Read the car seat manual carefully. Follow all installation steps exactly as instructed. Each model may have specific rules for safety. Do not skip this step, as it ensures the seat fits your vehicle correctly and protects your infant.
Common Installation Mistakes
Installing a rear-facing infant car seat is essential for your baby’s safety. Many parents make common mistakes that reduce protection. Knowing these errors helps keep your child safe and secure.
Loose Installation
A loose car seat can move too much during a crash. The seat should not move more than one inch side to side or front to back. Check the tightness by grabbing the seat near the belt path and shaking it. Tighten the seatbelt or latch system until the seat is firmly in place.
Incorrect Harness Position
The harness must fit snugly against your baby’s chest. The straps should lie flat without twists. For rear-facing seats, position the harness straps at or below the baby’s shoulders. A loose or misplaced harness can cause injury in a crash.
Ignoring Expiration Dates
Car seats have expiration dates for safety reasons. Materials can weaken over time. Using an expired seat puts your baby at risk. Check the label on the seat for the expiration date. Replace the seat once it passes that date.

Credit: www.youtube.com
Frequently Asked Questions
How Do I Install A Rear-facing Infant Car Seat Safely?
To install safely, read both car seat and vehicle manuals. Position the seat rear-facing in the back seat. Secure using the seat belt or LATCH system tightly. Ensure the seat does not move more than one inch side to side or front to back.
When Should I Switch From Rear-facing To Forward-facing?
Keep your child rear-facing until at least age two or until they reach the maximum height or weight allowed by the car seat manufacturer. Rear-facing seats provide better protection for your child’s head, neck, and spine in a crash.
Can I Use The Seat Belt Instead Of Latch?
Yes, you can use the seat belt if your vehicle or car seat doesn’t support LATCH. Both methods are safe if installed correctly. Always follow your car seat and vehicle manuals to ensure proper installation and tightness.
How Tight Should The Car Seat Installation Be?
The car seat should not move more than one inch side to side or front to back at the belt path. Tighten the seat belt or LATCH strap firmly. A snug fit ensures your baby’s safety during travel.
Conclusion
Installing a rear-facing infant car seat keeps your baby safe on every trip. Always read the car seat manual and your vehicle’s guide carefully. Tighten straps and check the seat’s angle for proper support. Double-check your work before driving. Practice makes perfect.
Safety comes first, so take your time. Your baby deserves the best protection. Follow these steps to feel confident and secure. Driving with a correctly installed car seat brings peace of mind. Keep your little one safe and comfortable always.