
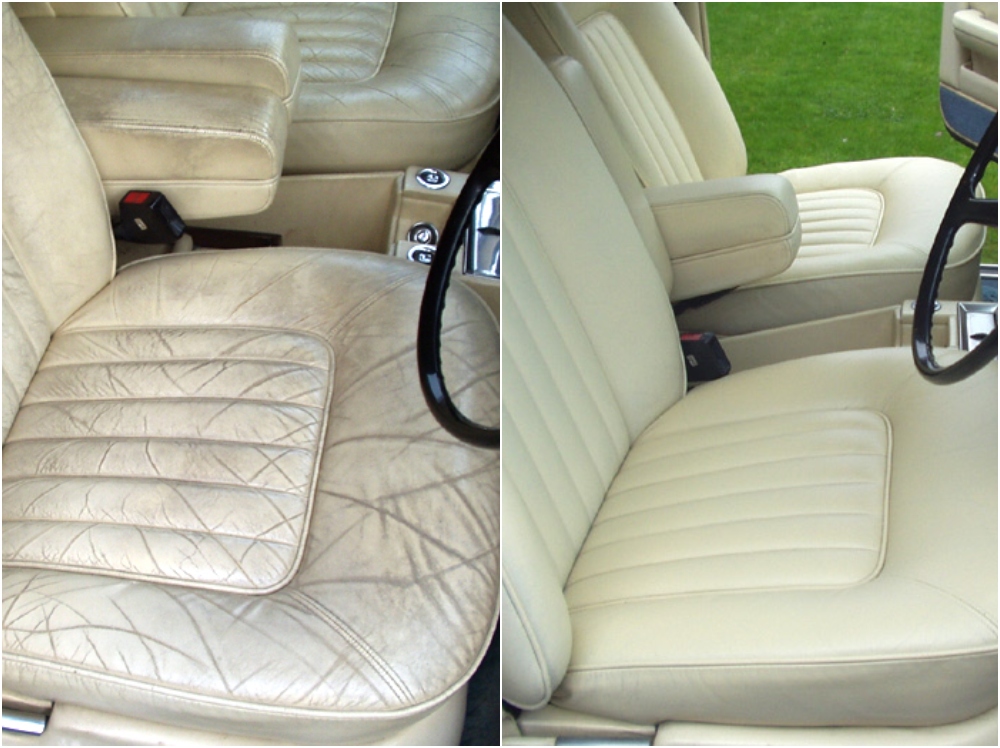
Are your leather car seats looking worn out, faded, or cracked? You don’t have to live with that tired, old look.
Imagine sliding into your car and feeling that smooth, rich leather again—like the day you first bought it. Restoring your leather seats is easier than you think, and it can save you money while bringing new life to your car’s interior.
In this guide, you’ll discover simple, effective steps to make your leather seats look fresh and clean. Ready to give your car that wow factor? Let’s dive in and restore your leather seats to their former glory.
Assess Leather Condition
Before restoring leather car seats, start by assessing their condition. This step helps you know what work is needed. It saves time and prevents mistakes.
Careful assessment lets you choose the right cleaning and repair methods. It also protects the leather from further damage.
Check For Damage
Look closely at the leather for cracks, tears, or holes. Small cracks can be fixed with conditioners. Bigger tears need patching or professional help.
Check for stains or discoloration. Some stains can be cleaned easily. Others might require special products or deeper treatment.
Identify Leather Type
Know the type of leather before starting restoration. Common types include aniline, semi-aniline, and pigmented leather.
Aniline leather is soft but sensitive to stains. Semi-aniline has a light coating for protection. Pigmented leather has a thicker finish and is easier to clean.
Using the wrong product can harm the leather. Knowing the type helps pick safe and effective cleaners.
Credit: www.furnitureclinic.ae
Gather Restoration Supplies
Gathering the right supplies is the first step to restore leather car seats. Having good materials makes the process easier and improves results. Prepare everything before starting. This saves time and avoids mistakes.
Cleaning Products
Choose a gentle leather cleaner made for car seats. Harsh soaps can damage leather. Use a soft cloth or sponge to apply the cleaner. Clean dirt and stains carefully. Avoid soaking the leather with too much liquid. Dry the surface with a clean towel.
Repair Kits
Leather repair kits fix cracks, tears, and holes. Kits usually include filler, adhesive, and color compounds. Pick a kit that matches your seat color. Follow the instructions step-by-step. Take your time to apply the filler smoothly. Allow the repair to dry completely before moving on.
Conditioners And Protectants
Conditioners keep leather soft and prevent cracking. Apply a thin layer evenly with a clean cloth. Let the conditioner soak in for several minutes. Buff the seat with a dry cloth to remove excess. Protectants add a shield against stains and sun damage. Use them regularly to extend seat life.
Clean Leather Seats
Cleaning leather car seats is the first step in restoring their look and feel. Dirt and stains can damage leather over time. Removing grime helps protect the material and keeps seats soft. Follow these simple steps to clean your leather seats safely and effectively.
Vacuum Dirt And Debris
Use a vacuum cleaner with a soft brush attachment. Gently remove loose dirt and crumbs from the seat surface. Pay attention to seams and crevices where dust gathers. This prevents dirt from scratching the leather during cleaning.
Apply Leather Cleaner
Choose a cleaner made specifically for leather. Apply a small amount to a soft cloth, not directly on the seat. Rub the cleaner gently in circular motions. This lifts dirt without harming the leather’s finish.
Wipe And Dry
Take a clean, damp cloth to wipe off the cleaner. Remove all residue to avoid sticky spots. Use a dry towel to pat the seats dry. Let the leather air dry completely before moving to the next step.
Repair Scratches And Cracks
Repairing scratches and cracks is key to restoring leather car seats. These damages can make seats look old and worn. Fixing them improves the seat’s appearance and extends its life. The process includes filling deep cracks, smoothing the surface, and letting the repair set properly.
Fill Deep Cracks
Start by cleaning the damaged area with a soft cloth. Use a leather filler to fill deep cracks. Apply the filler with a small spatula or your finger. Press it gently to fill every gap. Let the filler dry before moving to the next step.
Smooth Surface
After the filler dries, sand the area lightly with fine sandpaper. This smooths the surface and removes rough edges. Wipe away dust with a clean cloth. A smooth surface helps the repair blend with the seat.
Allow Repair To Set
Let the repaired area sit for several hours. Avoid touching or using the seat during this time. The repair needs time to harden and bond with the leather. Proper setting ensures long-lasting results.
Restore Leather Color
Restoring the color of leather car seats brings back their fresh and new look. Over time, leather can fade or lose its original shade. Fixing the color helps your car interior look clean and well cared for. This process needs careful steps to get the best result. Follow these tips to restore leather color like a pro.
Choose Matching Dye
Select a dye that matches your seat color exactly. Test the dye on a small hidden spot first. This step avoids color mistakes and ensures a perfect match. Use leather-specific dyes for best results. Avoid regular fabric or paint dyes that may damage the leather.
Apply Dye Evenly
Use a soft cloth or sponge to apply the dye. Spread it smoothly and evenly across the leather surface. Avoid thick layers that can crack or peel later. Work in small sections to control the dye application better. Let each layer dry before applying the next.
Dry And Reapply If Needed
Allow the dye to dry fully after each coat. Check the color and coverage once dry. Apply another coat if the color is too light or uneven. Multiple thin layers give a richer and more natural look. Let the final coat dry completely before using the seats.
Condition And Protect
Conditioning and protecting leather car seats keeps them soft and strong. It stops the leather from drying out and cracking. This step is key to making your seats last longer and look great.
Apply Leather Conditioner
Choose a good leather conditioner made for car seats. Use a clean cloth to apply it evenly. Work the conditioner into the leather with small circles. Let it soak in for about 15 minutes. This helps restore moisture and flexibility.
Buff Seats
After the conditioner dries, take a soft cloth. Gently buff the seats to remove excess conditioner. Buffing also brings out a nice shine. It smooths the leather surface and improves texture.
Use Leather Protectant
Leather protectant adds a shield against stains and sun damage. Spray a light coat over your seats. Let it dry fully before using the car. This layer helps keep the leather clean and safe from wear.
Maintain Leather Seats
Maintaining leather seats keeps your car looking fresh and lasting longer. Leather is delicate and needs care to avoid cracks and fading. Small daily habits protect your investment and keep the seats soft and clean.
Regular Cleaning Routine
Clean leather seats often to remove dust and dirt. Use a soft cloth and a gentle cleaner made for leather. Avoid harsh chemicals that dry out the leather. Wipe spills immediately to prevent stains. Regular cleaning stops dirt from settling deep.
Avoid Direct Sunlight
Sunlight causes leather to fade and crack over time. Park your car in the shade or use sunshades on windows. Keep the seats covered during long periods of sun exposure. This helps keep the leather color rich and the texture smooth.
Use Seat Covers When Necessary
Seat covers protect leather from spills, dirt, and wear. Use covers during messy trips or with pets and kids. Choose breathable covers to avoid trapping heat and moisture. Covers extend the life of your leather seats.

Credit: www.leathercare.com

Credit: www.furnitureclinic.co.uk
Frequently Asked Questions
How Do You Clean Leather Car Seats Before Restoration?
Start by vacuuming to remove dirt and debris. Use a leather cleaner with a soft cloth. Avoid harsh chemicals that can damage leather. Clean gently to preserve the leather’s natural oils and texture.
What Products Are Best For Restoring Leather Car Seats?
Use leather conditioners, cleaners, and repair kits made specifically for automotive leather. Avoid household products. Choose pH-balanced, non-toxic items to prevent damage and keep leather soft and supple.
How Often Should Leather Car Seats Be Restored?
Restore leather seats every 6 to 12 months. Regular care prevents cracks and fading. High-traffic cars may need more frequent restoration to maintain appearance and durability.
Can Diy Leather Repair Kits Fix Deep Cracks?
DIY kits can fix minor cracks and scratches effectively. For deep cracks or tears, professional repair is recommended. Proper preparation and following instructions are key for best results.
Conclusion
Restoring leather car seats takes patience and care. Clean the seats gently with the right products. Repair any cracks or tears carefully. Use leather conditioner to keep the material soft. Regular maintenance helps seats last longer. Small steps make a big difference.
Your car will look fresh and neat again. Enjoy the comfort of well-kept leather seats. Keep these tips handy for future touch-ups. Simple actions protect your car’s value and style.