
Are your car’s leather seats showing cracks and wear? It’s frustrating to see your once-smooth seats look old and damaged.
But don’t worry—fixing cracked leather seats is easier than you think. In this guide, you’ll discover simple, effective steps to restore your leather’s look and feel. By following these tips, you can bring back that fresh, clean finish without spending a fortune.
Keep reading to learn how to make your car’s interior look like new again!
Identify The Damage
Before fixing cracked leather seats, you must identify the damage. This step helps choose the right repair method. Knowing the type and severity of cracks saves time and effort. It also improves the final look of your car seats.
Look closely at the leather surface. Check for patterns, size, and depth of cracks. This helps understand the wear and tear on your seats.
Types Of Leather Cracks
Leather cracks come in different forms. Some cracks are small and shallow. These are surface cracks caused by dryness or sun exposure. Others are deep and wide. Deep cracks may show the foam or fabric underneath. These cracks need more care to fix.
Fine lines appear as wrinkles or creases. They do not break the leather. These wrinkles often form from regular use and bending. Larger cracks break the leather surface. They can cause peeling or flaking. Knowing the type of crack helps in picking the right repair kit or method.
Assessing Severity
Check how deep and wide the cracks are. Small cracks may only need cleaning and conditioner. Deep cracks require filling or patching. Look for missing leather pieces or holes. These need special repair compounds.
Test the leather around cracks. If it feels stiff or brittle, damage is severe. Softer leather is easier to restore. Also, check if the cracks spread when you press them. This shows if the damage is fresh or old.

Credit: www.youtube.com
Gather Repair Materials
Before fixing cracked leather seats, gather all needed materials. This step helps avoid interruptions during repair. Having the right tools and kits makes the job easier and more effective. Prepare a clean workspace to keep materials organized and accessible.
Essential Tools
Start with basic tools for leather repair. Soft cloths help clean the seat surface gently. A small brush or sponge applies repair compounds smoothly. Sandpaper with fine grit smooths rough edges around cracks. A heat gun or hair dryer speeds up drying time. Gloves protect your hands from chemicals. Keep a small container of water nearby for cleaning purposes.
Recommended Repair Kits
Choose a kit designed for leather seat repair. Most kits include filler compounds for cracks. Color compounds help match your seat’s leather shade. Some kits come with adhesive for loose pieces. Look for kits with easy-to-follow instructions. Select kits with good reviews for best results. Avoid cheap kits that might damage leather further.
Clean The Leather Surface
Cleaning the leather surface is the first step to fix cracked car seats. Dirt and oils can damage leather further. Removing these helps the repair products work better.
Cleaning also brightens the leather and prepares it for treatment. Use gentle methods to avoid more cracks or fading. Let’s explore how to clean leather properly.
Choosing The Right Cleaner
Pick a cleaner made for leather, not general cleaners. Harsh chemicals can dry out leather and cause more cracks. Look for pH-balanced or mild soap cleaners.
Test the cleaner on a small, hidden area first. This step ensures no color change or damage. Avoid products with bleach or ammonia.
Proper Cleaning Techniques
Use a soft cloth or sponge to apply the cleaner. Do not scrub hard; gentle wiping is enough. Work in small sections to cover all areas evenly.
Remove all dirt and grime carefully. After cleaning, wipe the area with a damp cloth to remove soap residue. Let the leather dry naturally before any repairs.
Prepare The Cracked Area
Preparing the cracked area is the first step to fix leather seats. This step cleans and smooths the damage. Proper preparation helps the repair materials stick well. It also makes the repair last longer. Take your time to do this right.
Sanding And Smoothing
Start by cleaning the cracked area with a damp cloth. Let it dry completely. Use fine-grit sandpaper to gently sand the cracks. This removes loose leather and rough edges. Sand until the surface feels smooth. Be careful not to sand too much. Wipe away dust with a soft cloth before moving on.
Applying Leather Filler
Choose a leather filler made for car seats. Apply a small amount to the cracks using a spatula or your finger. Press the filler into the cracks firmly. Smooth the surface to match the seat. Let the filler dry as instructed on the product. Apply more layers if needed for deeper cracks. Sand lightly between layers for a smooth finish.
Color Matching And Application
Color matching and application are key steps in fixing cracked leather seats. Proper color matching makes the repair look natural. Correct application helps the color last long and blend well. These steps restore the seat’s original look and protect it from further damage.
Selecting The Correct Dye
Choose a dye that matches your seat color closely. Test the dye on a hidden spot first. This ensures the color matches under different lights. Use leather-specific dyes for better results. Avoid fabric or wood dyes as they don’t work well on leather.
Consider the type of leather too. Some dyes work better on smooth leather. Others suit textured leather surfaces. Match the dye type for a smooth finish and strong hold.
Applying Color Evenly
Clean the leather surface before applying dye. Remove dirt, oils, and old finish for better adhesion. Use a soft sponge or applicator for even coverage. Apply thin layers and let each dry fully.
Patience is important. Multiple thin coats work better than one thick coat. Blend edges carefully to avoid harsh lines. Finish with a leather conditioner to seal and protect the color.

Credit: mechanics.stackexchange.com
Seal And Protect
After fixing cracks in your leather seats, sealing and protecting is crucial. It stops further damage and keeps the leather soft. This step helps your seats last longer and look better.
Sealing creates a barrier against dirt, water, and sunlight. Protection helps maintain the leather’s natural shine. Let’s explore how to do this well.
Using Leather Sealant
Leather sealant locks in repairs and shields the surface. Apply a thin, even coat with a soft cloth or sponge. Avoid using too much; it can make the leather stiff.
Allow the sealant to dry completely, usually about 30 minutes. Some sealants need multiple coats for better protection. Follow the product instructions carefully for best results.
Maintaining Repairs
Keep your leather seats clean to preserve the sealant. Use a gentle leather cleaner once a week or as needed. Avoid harsh chemicals that can break down the sealant and leather.
Condition the leather monthly to keep it soft and supple. This supports the sealed area and prevents new cracks. Regular care extends the life of your repairs and your seats.
Prevent Future Cracks
Preventing future cracks in your car’s leather seats is key to keeping them looking new. Regular care and smart habits extend the life of the leather. Small efforts protect your seats from damage and wear.
Regular Conditioning
Leather needs moisture to stay soft and strong. Apply a leather conditioner every three months. Use a soft cloth to spread it evenly. This stops the leather from drying out and cracking.
Choose a conditioner made for car leather. Avoid products with harsh chemicals. Conditioning also helps keep the color rich and fresh.
Avoiding Damage Triggers
Sharp objects can cut or scratch leather easily. Keep keys, tools, and other sharp items away from the seats. Avoid sitting with heavy items in your pockets.
Limit direct sun exposure. Park in the shade or use sunshades. Sunlight dries leather and causes fading and cracks.
Keep your seats clean. Dirt and dust wear down the leather over time. Wipe spills quickly to prevent stains and damage.
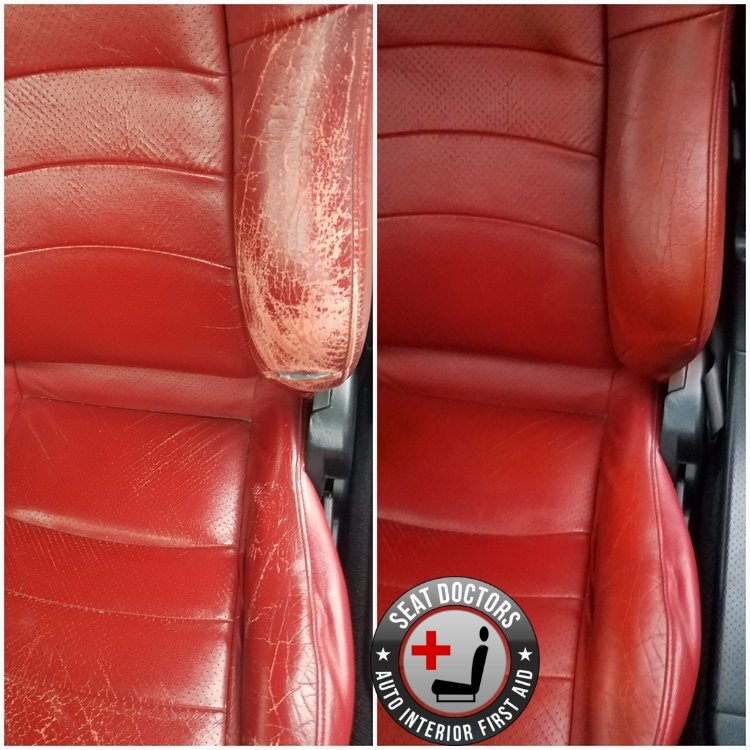
Credit: www.seatdoctors.com
Frequently Asked Questions
How Can I Repair Small Cracks In Leather Car Seats?
You can repair small cracks by cleaning the seat first. Use a leather filler or repair kit to fill cracks. Apply colorant to match the seat color. Finish with a leather conditioner to restore softness and protection.
What Tools Are Needed To Fix Cracked Leather Seats?
Basic tools include a leather cleaner, filler compound, sandpaper, applicator, colorant, and conditioner. These help clean, fill cracks, smooth surfaces, and restore color. Using the right tools ensures a professional-looking repair and prolongs the seat’s life.
Can I Fix Cracked Leather Seats Without Professional Help?
Yes, many DIY kits are available for home repairs. Follow instructions carefully to clean, fill, and color cracks. DIY fixes save money and can be effective for minor damage. For large cracks, professional repair is recommended.
How Long Does It Take To Repair Cracked Leather Seats?
Minor repairs usually take 1 to 2 hours, including drying time. Larger cracks or extensive damage may require several hours or multiple sessions. Allow proper drying for filler and colorant to ensure durability.
Conclusion
Fixing cracked leather seats keeps your car looking fresh. Small cracks do not need expensive repairs. Clean the seat well before starting any work. Use leather filler to smooth out cracks carefully. Let the repair dry completely for best results.
Finish with leather conditioner to protect the seat. Regular care stops cracks from growing bigger. You can save money by doing simple fixes yourself. A neat seat makes driving more comfortable and enjoyable. Try these steps to keep your car’s leather seats looking good.