
A small tear in your leather car seat can be frustrating. It might seem like a big problem that needs professional help or expensive repairs.
But what if you could fix it yourself quickly and easily? Imagine saving money and restoring your seat to look almost new again. In this guide, you’ll discover simple steps to repair that tear without stress or hassle. Keep reading, and you’ll learn how to protect your car’s interior and keep it looking great for years to come.
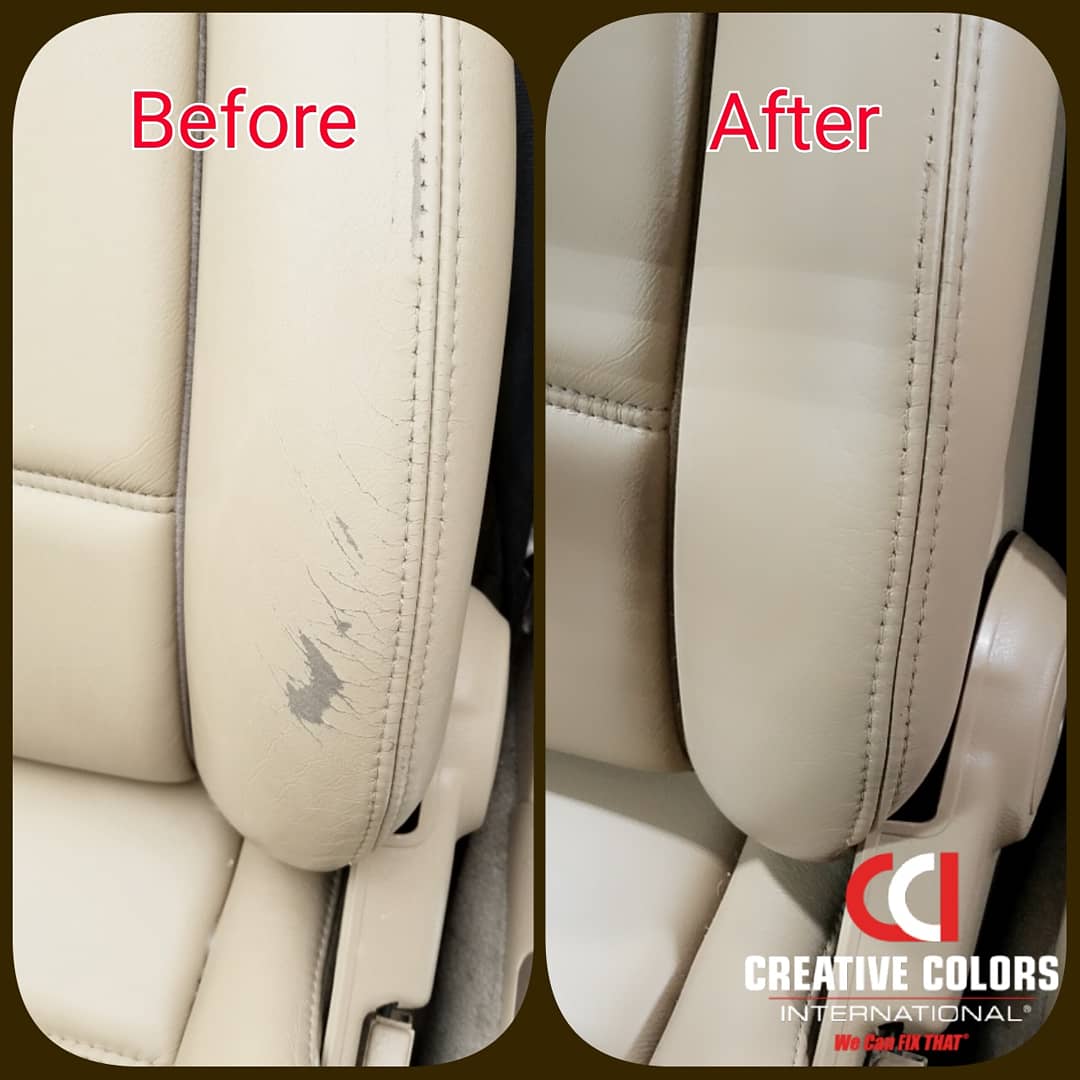
Assessing The Damage
Before fixing a small tear in your leather car seat, you must check the damage carefully. This step helps you know the size, shape, and depth of the tear. It guides you to choose the best repair method and tools. Taking time to assess the damage saves effort and gives better results.
Types Of Leather Tears
Leather tears come in different forms. Some are simple cuts on the surface. Others may have rough edges or missing pieces. Small tears often look like thin cracks or splits. Larger tears might expose the seat’s fabric underneath. Knowing the type of tear helps decide how to fix it properly.
Tools And Materials Needed
Prepare the right tools before starting the repair. You will need leather glue or adhesive, a small patch, and a leather repair kit. A pair of scissors, sandpaper, and a cleaning cloth are also useful. Having all materials ready makes the repair process smooth and fast.
Credit: wecanfixthat.com
Preparing The Seat
Preparing the seat is the first step to fix a small tear in leather. A clean, smooth surface helps the repair material stick better. Take time to ready the area well. This makes the repair last longer and look neat.
Cleaning The Leather Surface
Start by removing dirt and oils from the leather. Use a soft cloth and a gentle leather cleaner. Wipe the area around the tear carefully. Avoid soaking the leather with too much liquid. Let the surface dry completely before moving on.
Trimming Loose Threads
Look closely at the edges of the tear. Cut away any loose threads or jagged bits. Use small scissors or a sharp blade for precision. This step stops further tearing during repair. It also creates a smooth edge for patching.
Simple Patch Repair
Simple patch repair is a quick and effective way to fix small tears in leather car seats. It stops the tear from growing and improves the seat’s look. This method saves money by avoiding costly replacements. You can do it yourself with basic tools and materials.
Choosing The Right Patch Material
Pick a patch that matches your seat’s leather color and texture. Leather patches work best for a natural look. Vinyl patches suit synthetic seats well. Make sure the patch is slightly bigger than the tear. Thin patches blend better and feel softer. Avoid patches that are too thick or stiff.
Applying The Patch
Clean the area around the tear. Remove dirt and oils for better glue hold. Cut the patch to size and shape it to fit. Use strong leather glue or adhesive made for car seats. Apply glue on the patch and under the tear edges. Press the patch firmly onto the seat. Hold it in place until the glue sets. Let it dry for several hours before using the seat. This ensures a secure and lasting repair.
Using Leather Repair Kits
Using leather repair kits is a practical way to fix small tears in car seats. These kits come with everything needed for a quick and neat repair. They save time and money compared to replacing the entire seat. The process is simple and does not require professional skills. Follow the steps carefully for the best results.
Selecting A Suitable Kit
Choose a kit that matches your seat’s leather color. Kits usually include color compounds to blend the repair. Check for kits with flexible adhesives to avoid stiffness. Look for kits that have good reviews for car seat repairs. Avoid kits meant only for furniture leather as car leather is different.
Step-by-step Application
Start by cleaning the tear and the area around it. Remove dirt and oils to help the repair stick better. Cut any loose threads or jagged edges gently. Apply the adhesive or filler from the kit inside the tear. Smooth it out to fill the gap evenly. Let it dry fully as per the instructions.
Mix the color compound to match your leather shade. Apply thin layers of color over the repair spot. Let each layer dry before adding the next one. Use a small spatula or brush for better control. Finish by applying a sealant to protect the repair. Allow the sealant to dry before using the seat.
Color Matching Techniques
Color matching is key to fixing small tears in leather car seats. It helps the repair blend well with the original color. This makes the tear less visible and keeps the seat looking good. Using the right color tones creates a natural look. Careful color matching saves time and effort during the repair.
Mixing Leather Dyes
Start by selecting dyes close to your seat’s color. Mix small amounts to test the shade. Use a palette or small containers for mixing. Add tiny drops of lighter or darker dyes. Stir well to see the true color. Adjust the mix until it matches the leather perfectly. Test the dye on a hidden spot first. This avoids mistakes and ensures a better match.
Blending Repairs Seamlessly
Apply the mixed dye carefully over the tear. Use a small brush or sponge for control. Blend the edges gently into the surrounding leather. Avoid harsh lines or color patches. Let the dye dry completely before adding more layers. Repeat the process until the color matches fully. This makes the repair look smooth and natural. Proper blending hides the tear well, keeping your seat looking new.

Credit: community.cartalk.com
Finishing Touches
Finishing touches are key to a lasting leather car seat repair. They protect the fixed area and help the leather look good as new. Taking time for these steps ensures the repair blends well with the rest of the seat.
Sealing The Repair
Sealing the repair locks in the patch or filler. Use a leather sealant or strong glue made for leather. Apply a thin layer over the repaired spot. Let it dry fully to keep dirt and moisture out. This step stops the tear from getting worse.
Conditioning The Leather
Conditioning softens the leather and keeps it flexible. Choose a leather conditioner that suits your car seat. Rub a small amount gently onto the seat with a clean cloth. This helps prevent cracks and keeps the leather smooth. Regular conditioning extends the life of your seat.
Preventing Future Damage
Preventing future damage to leather car seats keeps them looking new longer. Small tears can grow if not cared for well. Taking steps to protect the leather stops costly repairs later. Simple habits help maintain the seat’s strength and beauty.
Regular Maintenance Tips
Clean leather seats often with a soft cloth. Use leather cleaner made for car interiors. Avoid harsh chemicals that dry out the leather. Apply leather conditioner every few months. This keeps the leather soft and less likely to crack.
Check the seats for small scratches or tears regularly. Fix minor damage quickly to stop it from getting worse. Keep sharp objects away from the seats. Dirt and dust can wear down leather over time. Vacuum the seats gently to remove debris.
Using Seat Covers
Seat covers protect leather from spills, dirt, and sun damage. Choose covers made for leather seats to avoid scratching. Covers reduce wear from daily use. They are easy to remove and clean. Using seat covers extends the life of your leather seats.
Pick covers that fit well and allow air to flow. This prevents moisture buildup under the cover. Replace covers if they become worn or torn. Seat covers are a simple way to guard against damage.

Credit: www.reddit.com
Frequently Asked Questions
How Do I Fix A Small Tear In Leather Car Seats?
To fix small tears, clean the area first. Use a leather repair kit with adhesive and a patch. Apply the adhesive, place the patch underneath, and smooth the surface. Allow it to dry fully for a seamless repair.
What Materials Are Needed To Repair Leather Car Seat Tears?
You need a leather repair kit, including adhesive, filler, colorant, and a patch. Also, have a cleaning cloth and sandpaper. These materials help restore the leather’s texture and color while sealing the tear properly.
Can I Repair Leather Car Seats Without Professional Help?
Yes, small tears can be fixed at home using DIY leather repair kits. These kits come with clear instructions and materials. However, larger or complex damage may require professional assistance for best results.
How Long Does A Leather Seat Tear Repair Take?
Repairing a small tear usually takes 30 minutes to an hour. Drying time can vary from a few hours to overnight. Proper curing ensures the repair is strong and blends well with the seat.
Conclusion
Repairing a small tear in your leather car seat is simple and cost-effective. You can save money by doing it yourself. With the right tools, the process takes only a short time. A fixed seat looks neat and lasts longer.
Taking care of leather prevents bigger damage later. Keep your car interior clean and protected. Small fixes make a big difference in comfort and value. Try these steps to keep your car seat looking fresh. Your effort will pay off with a smooth, clean finish.