
Are your car seats looking worn out or outdated? Imagine giving your car a fresh, personalized look without spending a fortune.
Sewing your own seat covers might sound tricky, but with the right steps, you can create custom covers that fit perfectly and protect your seats for years. In this guide, you’ll discover easy-to-follow tips that make the process simple and even fun.
Ready to transform your car’s interior and show off your style? Let’s get started!
Materials Needed
Sewing your own car seat covers needs the right materials. Choosing good fabrics and tools helps you make strong, neat covers. This section lists all you need to start sewing seat covers for your car.
Fabric Choices
Select fabrics that are tough and easy to clean. Canvas, denim, and leatherette work well. These materials resist wear and last long. Also, pick colors that match your car’s interior. Breathable fabrics keep seats cool and comfortable. Avoid thin or slippery fabrics that wear out fast.
Tools And Supplies
You will need a sewing machine that handles thick fabrics. Sharp fabric scissors are important for clean cuts. Use pins or clips to hold fabric pieces together. A measuring tape helps take accurate seat measurements. Thread should be strong and color-matched to your fabric. A chalk pencil or fabric marker makes cutting easier.
Additional Accessories
Consider foam padding for extra seat comfort. Zippers or Velcro strips allow easy removal of covers. Elastic bands help fit covers tightly on seats. Adding fabric glue can secure edges before sewing. Labels or tags help identify seat covers if needed.

Credit: www.youtube.com
Measuring Your Seats
Measuring your car seats is the first step in sewing perfect seat covers. Accurate measurements ensure the covers fit well and look great. Take your time to get every detail right. This helps avoid mistakes and saves fabric.
Taking Accurate Dimensions
Use a soft tape measure for best results. Measure the seat width, length, and height carefully. Check the seat cushion and backrest separately. Measure the depth from front to back of the seat. Note the distance between the seat and any headrests.
Recording Measurements
Write down every measurement clearly. Use a notebook or a digital app. Mark which number belongs to which part of the seat. Take photos if needed to remember details. Double-check all numbers before cutting fabric.
Considering Seat Features
Look at special seat parts like armrests or side bolsters. Measure around these features to include them in your design. Note any gaps or seams in the seat. Remember to allow extra fabric for zippers or fasteners. This makes the cover fit snugly.
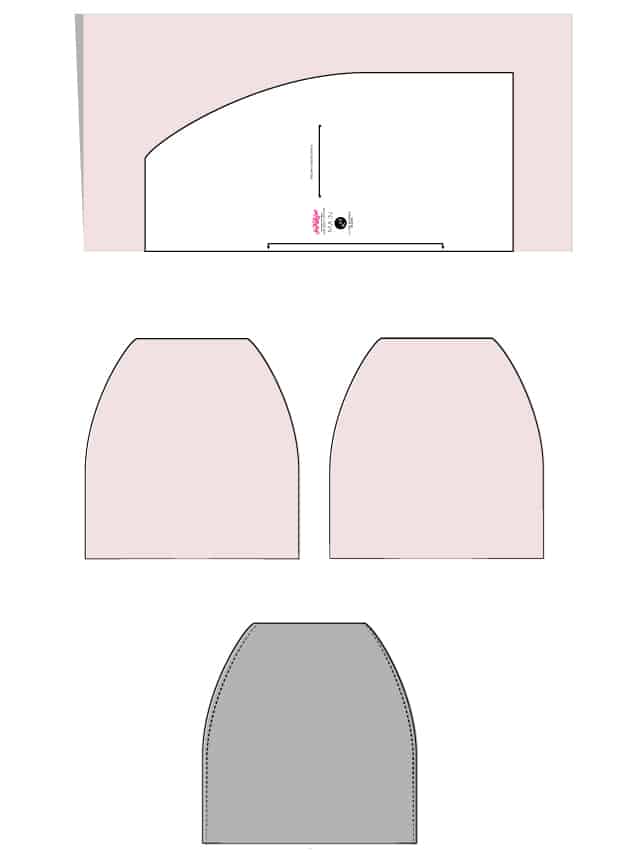
Creating The Pattern
Creating the pattern is an essential step in sewing seat covers for your car. It ensures the covers fit perfectly and look neat. Careful planning saves time and fabric later. Follow clear steps to draft, adjust, and cut your pattern pieces.
Drafting Templates
Start by measuring your car seats carefully. Note the width, height, and depth of each part. Use paper or cardboard to create flat templates. Trace the shapes of seat sections on the templates. Mark any curves or seams clearly. These templates guide your fabric cutting.
Adjusting For Fit
Check the templates against your car seats. Add extra space for seams and comfort. Add about 1 to 2 inches on all sides. Make sure your pattern allows for seat adjustments. Modify the templates as needed to improve fit. Accurate patterns lead to well-fitted seat covers.
Cutting Fabric Pieces
Lay your fabric on a flat surface. Place the templates on the fabric carefully. Pin the templates to keep them steady. Cut around the edges with sharp scissors. Cut slowly to follow the pattern exactly. Label each fabric piece to avoid confusion later.
Credit: seekatesew.com
Sewing Basics
Sewing seat covers for your car starts with understanding the basics. These basics help you create strong, neat covers that last long. Knowing simple sewing steps makes the project easier and more fun. This section covers key sewing points for beginners.
Choosing Stitch Types
Select the right stitch for your seat cover fabric. Use a straight stitch for most parts. It holds fabric firmly. A zigzag stitch works well on stretchy or thick areas. It keeps seams flexible and prevents tearing. Pick stitches that match your fabric and use.
Seam Allowances
Seam allowance is the extra fabric between the stitch line and the edge. Usually, ½ inch is enough for car seat covers. It gives space to sew and finish seams neatly. Cutting fabric with proper seam allowances helps avoid frayed edges. It also makes sewing easier and stronger.
Using A Sewing Machine
A sewing machine speeds up your seat cover project. Use a strong needle made for heavy fabrics. Adjust stitch length to about 2.5 mm for durability. Keep fabric flat and guide it gently while sewing. Slow down at curves or thick parts for better control. This keeps your stitches even and clean.
Assembling The Covers
Assembling the seat covers is a key step in making your car seats look neat and fit well. This part brings all fabric pieces together and prepares the cover for a secure fit. Taking care during assembly ensures durability and comfort.
Joining Fabric Sections
Start by aligning the fabric sections carefully. Use pins to hold edges together before sewing. Sew along the edges with a strong stitch to connect the pieces. Check seams for any gaps or loose threads. A tight seam keeps the cover strong and smooth.
Inserting Elastic Or Straps
Elastic bands or straps help the cover stay in place on the seat. Measure the needed length to wrap under the seat securely. Sew the elastic or straps to the cover edges. Stretch the elastic slightly as you sew to keep tension. Make sure the straps have enough length for easy fastening.
Adding Fasteners
Fasteners like Velcro, snaps, or buttons hold the cover firmly. Place them where the cover meets the seat edges or under the seat. Sew or attach fasteners securely to the fabric. Test the fasteners by fitting the cover on the seat. Adjust placement if needed for a tight hold.
Fitting And Adjusting
Fitting and adjusting seat covers is a key step in making sure they look good and stay in place. This process helps the covers match the seat shape and size perfectly. It also ensures comfort and protects your car seats well.
Take your time during this stage. A well-fitted cover lasts longer and feels better to sit on. Pay attention to details and small changes needed.
Testing The Fit On Seats
Start by placing the cover on the seat carefully. Check if it fits over the seat corners and curves. Make sure the cover does not feel too tight or too loose.
Look at the seams and edges. They should align with the seat lines. Sit on the seat to test comfort and fit while moving.
Making Alterations
Mark areas that need changes with pins or chalk. Cut small amounts of fabric if the cover is too big. Sew tighter seams if the cover feels loose.
Adjust straps or fasteners to hold the cover firmly. Make sure the cover can stretch slightly but stays secure. Check again after each change.
Final Touches
Sew any remaining open edges neatly. Remove pins or chalk marks carefully. Smooth out wrinkles and folds for a clean look.
Double-check all seams and fasteners. Clean the cover from loose threads. Your seat cover should now look neat and fit well.
Maintenance Tips
Keeping your car seat covers in good shape takes some care. Regular maintenance helps your covers look fresh and last longer. Small actions can prevent big problems and keep your seats comfy and neat.
Cleaning Instructions
Remove seat covers carefully before cleaning. Use mild soap and warm water for washing. Avoid harsh chemicals that can damage fabric. Spot clean stains quickly to stop them from setting. Let covers air dry completely before putting them back.
Repairing Minor Damage
Fix small tears or holes as soon as you see them. Use a needle and thread to sew minor rips. For fabric patches, match the color and texture closely. Repairing early stops damage from getting worse. Keep a repair kit handy in your car.
Extending Cover Lifespan
Protect covers from direct sunlight to avoid fading. Remove dirt and debris regularly with a soft brush. Avoid eating or drinking on seats to reduce stains. Rotate covers occasionally to prevent uneven wear. Store extra covers in a cool, dry place.

Credit: www.lovetoknow.com
Frequently Asked Questions
How Do I Measure Car Seats For Seat Covers?
Measure seat width, height, and depth precisely. Include headrests and armrests if covered. Accurate measurements ensure a perfect fit.
What Materials Are Best For Car Seat Covers?
Choose durable fabrics like leather, neoprene, or polyester. Consider comfort, protection, and ease of cleaning for the best material.
Can I Sew Seat Covers Without Professional Tools?
Yes, basic sewing machines and hand tools work well. Use strong thread and follow a clear pattern for quality results.
How Long Does It Take To Sew Seat Covers?
Typically, sewing seat covers takes 4 to 8 hours. Time varies by skill level and seat complexity.
Conclusion
Sewing your own car seat covers saves money and adds personal style. Choose the right fabric and measure seats carefully. Cut and stitch pieces slowly for best results. Take your time and follow each step clearly. Enjoy fresh, clean, and well-fitted seat covers you made yourself.
This project builds skills and brings pride in your work. Try it out and see how much fun sewing can be. Your car will look neat and feel comfortable every ride. Simple steps lead to great results. Keep practicing and improve with each cover you create.