
Have you noticed cracks forming on your leather car seats? These cracks can make your car’s interior look old and worn out, even if the rest of your vehicle is in great shape.
But don’t worry—fixing those cracks is easier than you think. You’ll discover simple, effective steps to repair your leather seats and bring back that smooth, fresh look. Keep reading, and you’ll save money while protecting your car’s value and comfort.
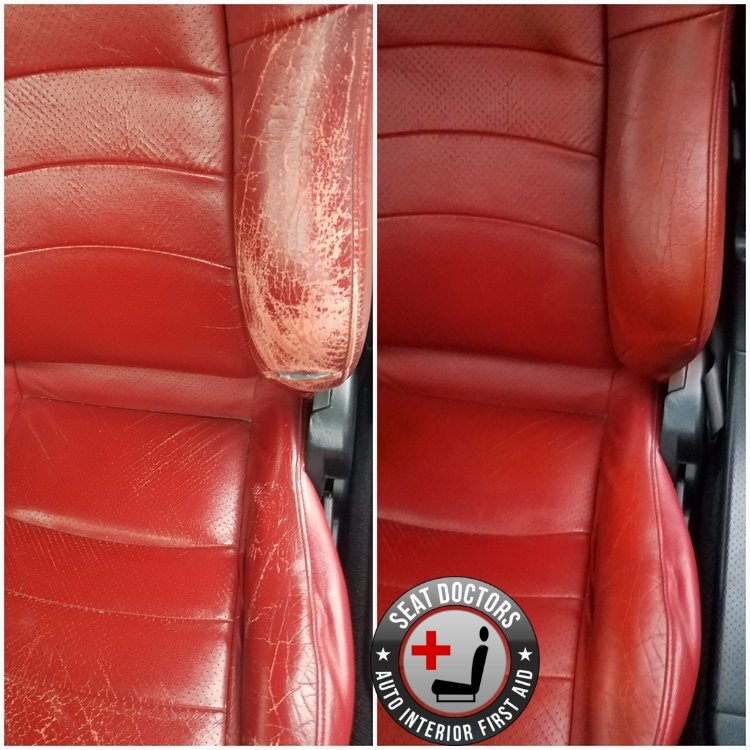
Credit: www.seatdoctors.com
Tools And Materials Needed
Repairing cracked leather car seats needs the right tools and materials. Using proper supplies helps fix cracks smoothly. It also makes the leather look better and last longer.
Gather all items before starting. This saves time and avoids interruptions during repair. Quality tools give the best results and protect your car seats.
Leather Cleaner
Clean the seat first with a leather cleaner. It removes dirt, oils, and old polish. A clean surface helps the repair material stick well.
Leather Repair Kit
Choose a leather repair kit made for car seats. It usually includes filler, adhesive, and color compounds. These materials fix cracks and match the seat color.
Sandpaper
Fine-grit sandpaper smooths rough edges around cracks. Sand lightly to avoid damaging the leather further. This step helps repair materials blend in.
Spatula Or Applicator
Use a small spatula or applicator to spread filler. It helps fill cracks evenly and neatly. A flat tool works best for smooth application.
Leather Conditioner
Apply leather conditioner after repairs dry. It keeps leather soft and prevents future cracks. Conditioning also restores the seat’s natural shine.
Soft Cloths
Soft cloths clean and buff the leather. Use them for applying cleaner and conditioner. Gentle cloths avoid scratching the leather surface.

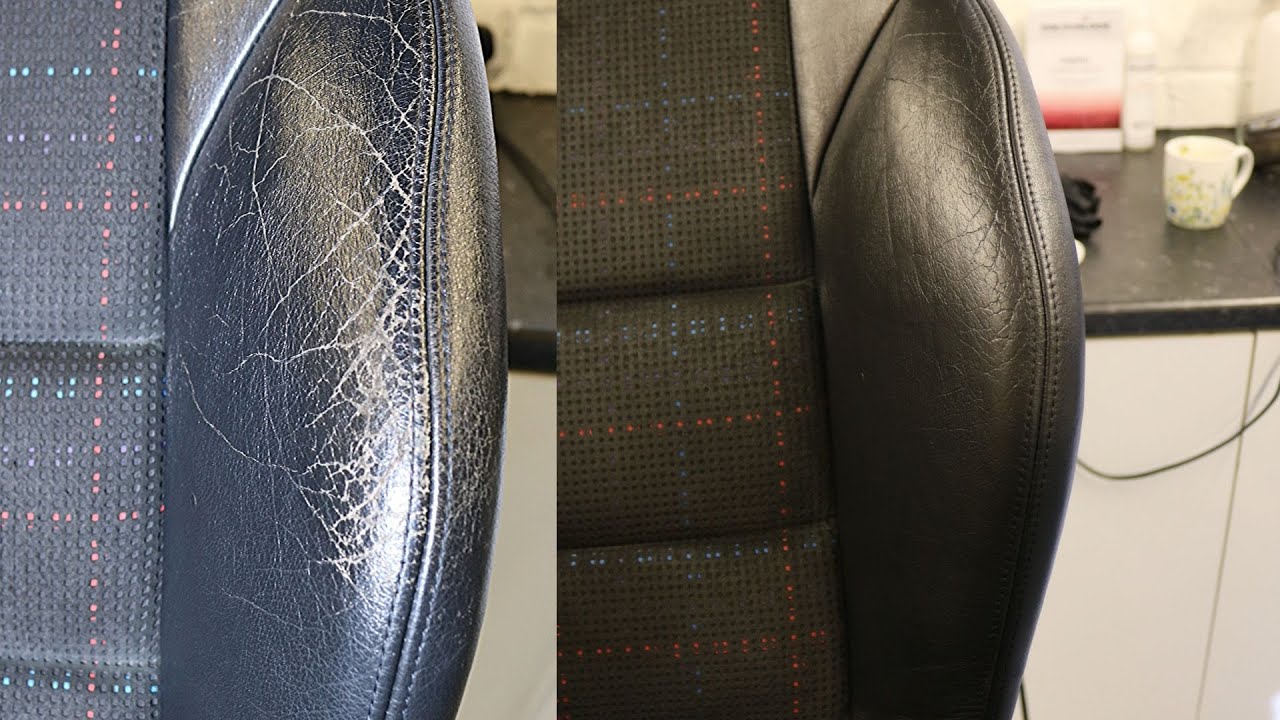
Credit: www.youtube.com
Preparing The Seat Surface
Preparing the seat surface is a key step before fixing cracked leather car seats. It makes sure the repair materials stick well. A clean and smooth surface helps the repair last longer and look better.
Start by removing dirt and oils from the leather. Then, gently roughen the cracked areas to help the filler bond. Proper preparation saves time and gives great results.
Cleaning The Leather
Use a soft cloth and leather cleaner to wipe the seat. Avoid harsh chemicals that can damage the leather. Clean every crack and crease carefully.
Let the seat dry completely. A dry surface is important for the next steps. Dirt or moisture can cause the repair to fail.
Sanding The Cracks
Use fine sandpaper to lightly sand the cracked areas. Sanding removes loose leather and smooths rough edges. Be gentle to avoid making the cracks bigger.
Wipe away dust with a clean cloth after sanding. A smooth surface helps the filler spread evenly. This step improves the final look of the repair.
Applying Leather Filler
Applying leather filler is a key step in fixing cracked car seats. It helps restore the smooth surface and prevents further damage. The filler fills gaps and cracks, making the leather look fresh again.
The process needs care and the right materials. Using the correct filler ensures a strong, lasting repair. Filling cracks properly makes the seat comfortable and good-looking.
Choosing The Right Filler
Choose a filler made for leather, not fabric or vinyl. Leather fillers are flexible and bond well to the seat. They dry fast and match the leather texture.
Look for a filler that is easy to apply and sand. Some fillers come in tubes, others in jars. Pick one that fits your repair size and skill.
Filling The Cracks
Clean the seat area before applying filler. Remove dirt and oils with a mild cleaner. Let it dry fully.
Use a small spatula or plastic card to apply filler. Press the filler into the cracks gently. Add layers if cracks are deep.
Let each layer dry before adding the next. Smooth the surface with fine sandpaper after the final layer. This gives a neat, even finish ready for coloring.
Smoothing And Sanding The Repair
Smoothing and sanding the repair is a key step in fixing cracked leather car seats. It helps to create a flat surface. This step makes the repair blend well with the rest of the seat. Taking time here improves the look and feel of your car seat.
After applying the filler or repair compound, let it dry fully. Drying time varies depending on the product. Follow the instructions on the package carefully.
Sanding With Fine-grit Sandpaper
Use fine-grit sandpaper, like 600 to 800 grit. Gently sand the repaired area in small circles. Avoid pressing too hard to stop damage to the leather. The goal is to smooth the surface evenly.
Removing Dust And Debris
After sanding, clean the area well. Use a soft cloth or brush to remove dust. Dust can stop the paint or conditioner from sticking well. Make sure the surface is clean before moving on.
Checking For Uneven Spots
Look closely for bumps or low spots. Run your fingers over the repair. If needed, apply more filler and sand again. Repeat until the surface feels smooth and even.
Color Matching And Dyeing
Color matching and dyeing are key steps in fixing cracked leather car seats. Matching the right color helps the repair blend well. Dyeing restores the seat’s original look. These steps make the seat look fresh and uniform again.
Selecting The Correct Color
Choose a leather dye that matches your seat color exactly. Test the color on a small hidden spot first. Light can change how colors look. Use natural light for the best match. Pick a dye that is made for leather, not fabric or plastic.
Applying Leather Dye
Clean the leather surface before applying dye. Use a soft cloth or sponge to apply dye evenly. Apply thin layers to avoid streaks and blotches. Let each layer dry before adding the next. Repeat until the color looks even and smooth. Finish with a leather conditioner to keep the color lasting longer.
Sealing And Protecting The Leather
After fixing cracks in leather car seats, sealing and protecting the leather is key. This step stops new cracks and keeps the repair strong. It also helps the leather stay soft and look fresh. Proper sealing guards against dirt, water, and sunlight damage.
Using the right products and methods makes a big difference. It keeps your car seats safe for a long time. Let’s explore how to seal and protect your leather seats well.
Cleaning The Leather Before Sealing
Clean the leather gently to remove dirt and oils. Use a soft cloth and a mild leather cleaner. Avoid harsh chemicals that can damage the surface. Let the leather dry fully before applying any sealant.
Applying Leather Sealant
Choose a sealant made for leather car seats. Use a soft applicator or sponge to spread it evenly. Cover all repaired areas and the surrounding leather. Allow the sealant to dry as directed on the product label.
Using Leather Conditioner For Protection
After sealing, apply a leather conditioner to keep the leather soft. This prevents dryness and cracking over time. Use a clean cloth to rub the conditioner in gentle circles. Let it absorb completely before using the seats.
Regular Maintenance For Long-lasting Protection
Clean and condition your leather seats every few months. This routine keeps the sealant effective and leather healthy. Avoid harsh sun exposure or extreme temperatures. Use seat covers if needed to add extra protection.
Tips For Preventing Future Cracks
Preventing cracks in leather car seats keeps them looking new longer. Proper care stops damage before it starts. Small habits protect leather from drying and cracking.
Follow simple steps regularly. These tips help maintain leather’s softness and strength. Your seats stay smooth and comfortable.
Keep Leather Clean And Conditioned
Dirt and dust wear down leather fibers. Clean seats with a soft cloth often. Use a leather cleaner made for cars. Condition the leather every three months. This keeps it soft and prevents drying.
Protect Seats From Direct Sunlight
Sunlight heats and dries leather fast. Park in shade or use sunshades. Cover seats with cloth covers on hot days. This lowers damage from UV rays and heat.
Avoid Sharp Objects And Rough Use
Keys, tools, and zippers scratch leather easily. Be careful when placing items on seats. Avoid jumping or putting heavy pressure on leather. Gentle use keeps the surface intact.
Maintain Proper Car Interior Humidity
Dry air dries leather quickly. Use a humidifier inside the car if possible. Keep moisture balanced to stop cracks. This helps leather stay flexible and strong.
Credit: www.youtube.com
Frequently Asked Questions
How Can I Fix Cracked Leather Car Seats At Home?
You can repair cracked leather seats using a leather repair kit. Clean the area, apply filler, sand smoothly, and then dye the leather to match. This process restores appearance and prevents further damage.
What Materials Are Needed For Leather Seat Crack Repair?
You’ll need a leather cleaner, filler compound, sandpaper, leather dye, and a sealant. These materials help clean, fill cracks, smooth the surface, recolor, and protect the leather.
How Long Does Leather Car Seat Repair Take?
Repairing cracked leather seats typically takes 1 to 3 hours. Drying times between steps vary, but the process is usually completed in a single session.
Can I Prevent Leather Car Seat Cracks?
Yes, regularly clean and condition your leather seats. Avoid direct sunlight and extreme temperatures. Proper care keeps leather supple and reduces cracking.
Conclusion
Repairing cracked leather car seats is simpler than it seems. Small cracks need quick care to stop damage. Use the right tools and follow clear steps. Take your time to get smooth results. Clean and condition the leather regularly to keep it soft.
Your car’s interior will look fresh and last longer. This small effort saves money on costly replacements. Keep your seats comfortable and neat every day. Try these tips and enjoy your car’s new look.