
Are your car seats looking tired, stained, or just plain dirty? You don’t have to live with those stubborn spots or unpleasant smells any longer.
Cleaning your car seats with an extractor is easier than you think—and the results can make your car feel brand new again. In this guide, you’ll discover simple, step-by-step tips to get deep into the fabric and lift away dirt, grime, and odors.
Keep reading to transform your car’s interior and enjoy a fresher, cleaner ride every time you get behind the wheel.

Credit: www.dreamstime.com
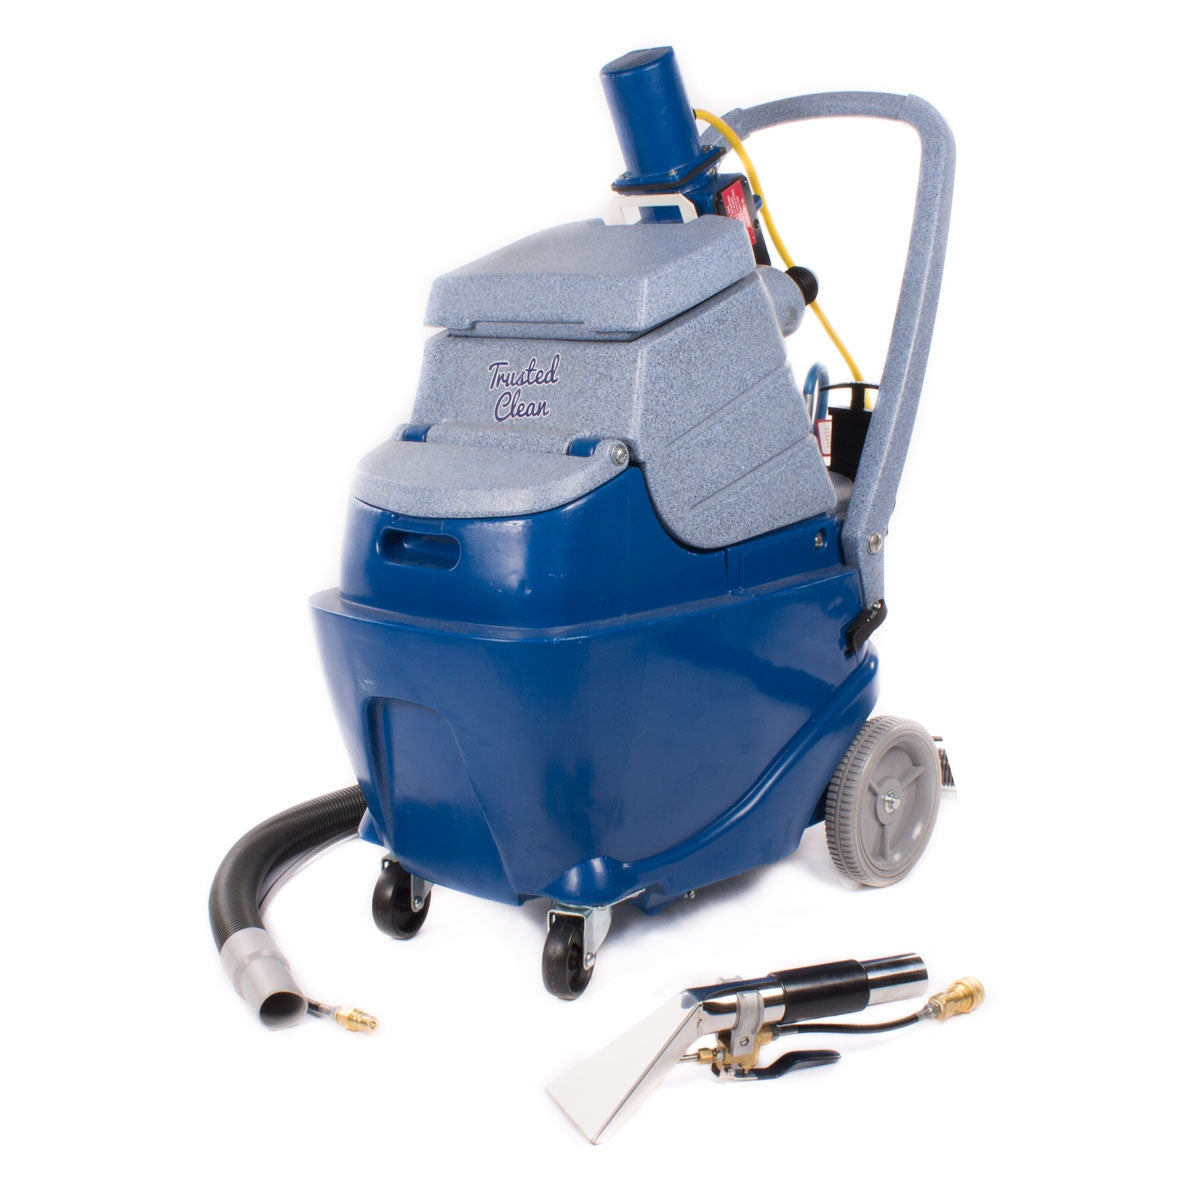
Choosing The Right Extractor
Choosing the right extractor is important for cleaning car seats well. The right tool saves time and cleans deeply. It also protects your car’s fabric from damage. Understanding the types of extractors helps you pick the best one for your needs. Knowing key features guides you to a smart choice. Budget-friendly options let you clean without spending too much.
Types Of Extractors
There are several types of extractors for car seats. Portable extractors are small and easy to use. They work well for quick cleaning. Truck-mounted extractors are powerful but heavy. They suit deep cleaning and larger jobs. Wet/dry extractors handle both water and dry dirt. Choose based on your cleaning needs and space.
Key Features To Consider
Look for strong suction power in an extractor. This helps remove dirt and water fast. A large water tank means longer cleaning time. Check if the extractor is easy to carry. A long power cord or cordless design adds convenience. Consider attachments for different fabric types. These features improve cleaning results and ease of use.
Budget-friendly Options
Good extractors do not need to be expensive. Basic models offer good cleaning for small jobs. Look for deals on reliable brands. Renting an extractor can save money for one-time use. Simple designs often last longer and need less repair. Choose a model that fits your budget and cleaning needs.
Preparing Your Car Seats
Preparing your car seats before cleaning with an extractor is important. Proper preparation helps the extractor work better. It also protects your car’s fabric from damage. Start by clearing any dirt and debris on the seats. Follow with a deep vacuuming to remove hidden dust. Finally, test a small spot to avoid fabric damage during cleaning.
Removing Loose Dirt And Debris
Start by brushing off loose dirt and crumbs. Use your hands or a soft brush for this. This step stops dirt from spreading during cleaning. Removing debris makes the extractor more effective. It also prevents dirt from sticking deeper into the fabric.
Vacuuming Thoroughly
Use a vacuum cleaner with a brush attachment. Vacuum every part of the seat carefully. Focus on seams and crevices where dirt hides. Vacuuming removes dust and small particles. It helps the cleaning solution reach deep stains better.
Spot Testing The Fabric
Choose a hidden area on the seat for testing. Apply a small amount of cleaning solution. Wait five to ten minutes to watch for damage. Check for color fading or fabric changes. Spot testing protects your seats from unwanted harm.
Selecting Cleaning Solutions
Selecting the right cleaning solution is key to cleaning car seats with an extractor. The wrong product can damage the fabric or leather. Choose a cleaner that suits your seat material. This helps remove dirt and stains without harming the surface. Safe and effective cleaning solutions make the job easier and protect your car’s interior.
Best Cleaners For Fabric Seats
Fabric seats need cleaners that remove dirt and stains gently. Use water-based cleaners made for upholstery. They lift dirt without soaking the fabric. Avoid harsh chemicals that break down fibers. Look for products with natural ingredients. These keep fabric soft and fresh. Test a small area before full cleaning to avoid color changes.
Safe Cleaners For Leather Seats
Leather seats need special care to stay soft and shiny. Use pH-balanced leather cleaners. These protect the leather’s natural oils. Avoid products with alcohol or bleach. They dry out and crack the leather. Apply cleaner with a soft cloth. Follow up with a leather conditioner. This keeps the leather smooth and flexible.
Homemade Vs. Commercial Products
Homemade solutions use common household items like vinegar or baking soda. They are cheap and easy to make. Use mild mixtures to avoid damage. Commercial products are tested for safety and effectiveness. They often clean deeper and protect better. Choose based on your needs and seat material. Always test any cleaner on a hidden spot first.
Credit: www.cleanfreak.com
Step-by-step Cleaning Process
Cleaning car seats with an extractor is simple. Follow these clear steps to get great results. This process helps remove dirt deep in the fabric. It also refreshes the seat’s look and feel. Each step is easy to do at home with the right tools.
Mixing The Cleaning Solution
Start by preparing the cleaning solution. Use warm water for better cleaning power. Add the right amount of cleaner made for upholstery. Stir gently to mix without making too many bubbles. Avoid using bleach or harsh chemicals. These can damage your seats.
Applying Solution With Extractor
Fill the extractor’s tank with the solution. Turn on the machine and spray evenly on the seat. Cover all dirty areas but do not soak the fabric. Use slow, smooth passes for even coverage. This step loosens dirt trapped in fibers.
Agitating Stains And Spots
Next, scrub stains softly with a brush or cloth. Work the cleaner into the fabric gently. Focus on spots that look darker or sticky. Agitating helps break up tough grime. Avoid harsh scrubbing to protect the seat material.
Extracting Dirt And Moisture
Use the extractor to suck out dirt and water. Move the nozzle slowly over the cleaned areas. The machine removes most of the moisture and dirt. Repeat if needed for very dirty spots. Let seats dry fully before use to prevent mold.
Drying And Aftercare
After cleaning car seats with an extractor, drying and aftercare are vital. Proper drying stops mold and bad smells. It also keeps your seats in good shape. Taking care of the seats after cleaning helps them last longer and look fresh.
Proper Drying Techniques
Remove as much moisture as possible with a clean towel. Press gently to soak up water without rubbing. Open the car doors to let fresh air in. Avoid sitting on the seats until they are fully dry. Check the seats often and repeat drying if needed.
Using Fans Or Ventilation
Use fans to speed up drying inside the car. Place fans near the seats but not too close. Keep windows open to improve airflow. Turn on the car’s air conditioner or heater to help dry faster. Good ventilation lowers the chance of mold growth.
Conditioning Leather Seats
Leather seats need special care after cleaning. Apply a leather conditioner to keep them soft and shiny. Use a soft cloth to spread the conditioner evenly. Let the conditioner soak in for a few minutes. Buff the seats lightly to finish and protect the leather.
Common Mistakes To Avoid
Cleaning car seats with an extractor can make your vehicle look fresh and new. Avoiding common mistakes ensures the best results. These errors often harm the seats or reduce cleaning effectiveness. Understanding what to avoid helps keep your car seats safe and clean.
Overwetting Seats
Too much water can damage car seats. Overwetting leads to mold and bad smells. It also weakens seat foam and fabric. Use the extractor carefully and do not soak the seats. Apply water in small amounts and dry quickly.
Using Harsh Chemicals
Strong chemicals can ruin car seat materials. They may cause fading or fabric damage. Always choose mild, seat-safe cleaners. Test any product on a small spot first. Gentle cleaners protect your seats and clean well.
Ignoring Manufacturer Instructions
Each car seat has specific care rules. Ignoring these can lead to damage or void warranties. Check the vehicle manual before cleaning. Follow all instructions about cleaning products and methods. This keeps your seats in good condition longer.
Maintaining Clean Car Seats
Keeping car seats clean is important for a fresh and healthy ride. Dirt, spills, and dust can build up quickly. Regular care helps your seats look new longer. Using a car seat extractor is great. But daily habits matter too. These simple steps keep your seats in top shape.
Regular Vacuuming
Vacuum your seats often to remove loose dirt and crumbs. Use a vacuum with a brush attachment. This prevents dirt from settling deep in the fabric. Clean under the seats and in crevices. Regular vacuuming stops dust from piling up. It also makes extractor cleaning easier and more effective.
Spot Cleaning Tips
Spills happen. Clean them quickly to avoid stains. Blot the spill gently with a clean cloth. Avoid rubbing, as it spreads the stain. Use a mild cleaner designed for car seats. Test it on a small area first. Treat spots as soon as you see them. This keeps your seats fresh between deep cleans.
Protective Seat Covers
Seat covers protect your seats from dirt and spills. Choose covers that fit well and are easy to remove. Wash covers regularly to keep them clean. Covers save your seats from wear and tear. They also make cleaning faster and simpler. A good cover helps maintain your car’s interior look.

Credit: www.youtube.com
Frequently Asked Questions
What Is The Best Extractor For Cleaning Car Seats?
The best extractor for car seats is a portable upholstery cleaner. It uses hot water and suction to remove dirt and stains effectively. Choose one with strong suction and a suitable nozzle for fabric or leather seats. This ensures deep and thorough cleaning.
How Do I Prepare Car Seats Before Using An Extractor?
Vacuum the seats thoroughly to remove loose dirt and debris. Spot-treat stains with a suitable cleaner. Test the extractor on a small hidden area first. This preparation helps the extractor clean more effectively and prevents damage to the fabric.
Can I Use A Carpet Extractor On Car Seats?
Yes, carpet extractors work well on fabric car seats. They apply cleaning solution and suction to remove dirt deeply. However, avoid using too much water to prevent soaking the seats. Always check manufacturer guidelines before use.
How Often Should I Clean Car Seats With An Extractor?
Cleaning car seats with an extractor every 3-6 months is ideal. Frequent cleaning keeps seats fresh, removes allergens, and prevents stains from setting. For heavily soiled seats, clean more often to maintain appearance and hygiene.
Conclusion
Cleaning car seats with an extractor keeps them fresh and neat. It removes dirt, stains, and odors deep inside the fabric. Regular cleaning helps protect your car’s interior and extends the seat’s life. Using the right tools and techniques makes the job easier and faster.
Give your car seats the care they need. A clean car feels more comfortable and looks great every day. Try this method and enjoy a cleaner ride.