
Your car’s leather seats add a touch of luxury and comfort to every ride. But when you spot a crack, it can feel like your car’s value and style are slipping away.
Don’t worry—fixing that crack is easier than you think. Imagine restoring your seat to look almost new without spending a fortune or taking it to a shop. In this guide, you’ll discover simple, step-by-step methods that anyone can follow. Ready to bring your leather seat back to life?
Let’s get started.
Identify The Crack Type
Knowing the type of crack in your leather car seat is the first step to fixing it right. Different cracks need different care and repair methods. Understanding whether the damage is light or deep helps you choose the best solution. This saves time and avoids further harm to your leather.
Start by looking closely at the crack. Is it just on the surface, or does it go deeper? Also, check the overall condition of the leather around the crack. These details guide your repair process.
Surface Scratches Vs Deep Cracks
Surface scratches are small and shallow marks on the leather. They usually do not break the leather’s top layer. These scratches can often be fixed with simple cleaning and conditioning.
Deep cracks are larger and go through the leather’s surface. They may cause splits or holes. These cracks need more repair work, such as filling and patching, to prevent worsening damage.
Assessing Leather Condition
Look at the leather’s texture and color around the crack. Is it dry or oily? Is the leather stiff or soft? Dry and stiff leather cracks more easily and may need special treatment.
Check for signs of wear like fading or peeling. Leather in poor condition may need extra care before repairing cracks. Good leather is easier to fix and last longer after repair.

Credit: www.reddit.com
Gather Repair Materials
Before fixing a crack in your leather car seat, gather all the right materials. Having everything ready makes the repair smooth and effective. Each item plays a key role in restoring the leather’s look and feel.
Leather Cleaner And Conditioner
Clean the cracked area first. Use a leather cleaner made for car seats. It removes dirt and oils that block repair products. After cleaning, apply leather conditioner. This softens the leather and prepares it for repair. Conditioned leather is less likely to crack again.
Leather Repair Kit Essentials
A repair kit includes all main materials. Look for kits with leather filler, color compounds, and patches. Leather filler fills cracks and small holes. Color compounds match your seat’s color. Patches cover larger damaged areas. Kits give you the exact supplies needed for good results.
Tools For Application
Use the right tools to apply repair materials. A small spatula or plastic spreader helps smooth filler evenly. Soft cloths or sponges apply cleaner and conditioner. Fine sandpaper may be needed to smooth dried filler. Proper tools ensure a neat and lasting repair.
Clean And Prepare The Seat
Before fixing a crack in your leather car seat, cleaning and preparing the surface is key. Dirt and oils can stop repair products from sticking well. A clean seat makes the repair last longer.
Proper preparation also helps you see the full damage clearly. This step sets the stage for a smooth and effective repair process.
Removing Dirt And Oils
Start by wiping the seat with a soft cloth. Use a leather cleaner or mild soap mixed with water. Gently rub the cracked area to remove dirt and oils. Avoid harsh chemicals that can damage leather. Repeat the cleaning until the seat feels clean to touch.
Use cotton swabs for tight spots. Dirt stuck in cracks can weaken repairs. Take your time to clean every bit of grime off the surface.
Drying The Leather Properly
After cleaning, dry the seat with a dry cloth. Let it air dry in a cool, shaded place. Avoid direct sunlight or heat sources like hair dryers. Heat can dry out leather and cause more cracks.
Wait until the seat feels completely dry before moving on. Moisture left in the leather can affect the repair glue or filler. Patience here ensures a strong, lasting fix.
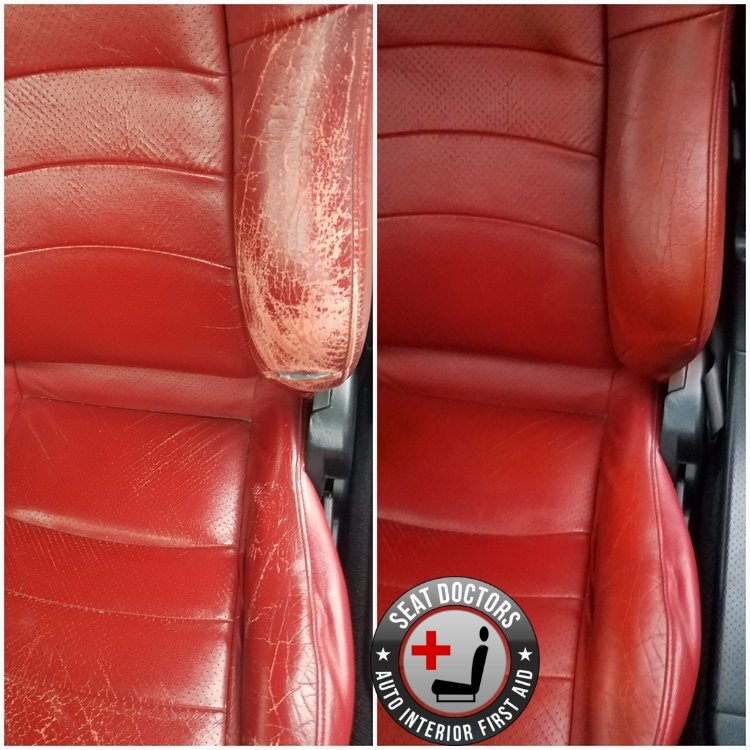
Credit: www.seatdoctors.com
Apply Leather Filler
Applying leather filler is a key step to fix cracks in your car seat. It fills the gaps and makes the surface smooth again. This process helps your leather look new and protects it from more damage. Use the right filler and apply it carefully for the best results.
Choosing The Right Filler
Select a filler made for leather repair. Avoid using wood putty or other fillers not made for leather. Leather fillers are soft and flexible, matching the leather’s movement. Pick a color close to your seat to blend the repair well. A good filler will stick well and dry fast.
Step-by-step Application
Start with a clean, dry crack. Use a small spatula or plastic card to apply the filler. Press the filler gently into the crack, filling it completely. Add thin layers if needed. Let each layer dry before adding the next. This builds a strong, even fill without lumps.
Smoothing The Surface
After the filler dries, sand it lightly with fine sandpaper. Sand until the surface feels even with the rest of the seat. Wipe away dust with a soft cloth. This step helps the repair blend in. A smooth surface is easier to color and looks natural.
Color Matching And Dyeing
Fixing a crack in a leather car seat is not just about repairing the damage. The color must match perfectly to look natural. Color matching and dyeing bring the seat back to life. It hides the repair and blends it with the rest of the seat. This step needs patience and careful attention.
Selecting The Correct Dye
Choose a dye that matches the original leather color closely. Test the dye on a small hidden area first. This helps to see how the color looks after drying. Leather dyes come in many shades, so pick the closest one. Avoid using fabric dyes or paints, as they do not work well on leather. Use a dye designed for leather to get the best results.
Blending For Seamless Repair
Apply the dye in thin, even layers. Let each layer dry before adding the next. Blend the edges of the dyed area with the surrounding leather. Use a soft cloth or sponge to gently blend colors. This avoids harsh lines and patches. The goal is to make the repair invisible to the eye. Take your time to achieve a smooth and natural finish.

Credit: www.tearmender.com
Finishing Touches
Finishing touches are key to making your repaired leather seat look great. These steps protect your work and keep the leather soft. Small efforts now save you from bigger problems later. Follow these tips carefully for the best results.
Applying Leather Sealant
Leather sealant locks in the repair and stops cracks from growing. Use a soft cloth or sponge to apply it gently. Cover the cracked area evenly with a thin layer. Let the sealant dry completely before touching the seat. This step shields the leather from water and dirt. It also helps the color stay fresh and even.
Conditioning For Longevity
Leather conditioner nourishes the material and prevents drying. Apply a small amount on a clean cloth. Rub it softly into the leather, covering the repaired spot. Conditioning keeps the leather flexible and less likely to crack again. Repeat this process every few months for lasting protection. Healthy leather looks better and lasts longer.
Prevent Future Damage
Preventing future damage is key to keeping leather car seats in good shape. Small cracks can turn into big tears if you do not protect the leather. Taking simple steps can extend your seat’s life and save money on repairs. Here are easy ways to prevent cracks and keep your seats looking fresh.
Regular Cleaning Habits
Clean your leather seats often using a soft cloth. Use a cleaner made for leather to avoid damage. Dirt and oils can wear down the leather over time. Wipe spills quickly to stop stains and cracks. Gentle cleaning keeps the leather soft and healthy.
Using Seat Covers
Seat covers protect leather from dirt, sun, and wear. Choose covers that fit well and allow the leather to breathe. Covers act as a barrier against spills and sharp objects. Using covers reduces direct contact and cuts down on damage.
Avoiding Harsh Conditions
Keep your car out of direct sunlight for long periods. Heat and UV rays dry out leather and cause cracks. Park in shaded areas or use sunshades on windows. Avoid extreme cold, which can also harden leather. Gentle conditions help leather stay flexible and strong.
Frequently Asked Questions
How Do I Repair A Small Crack In A Leather Car Seat?
Clean the crack thoroughly first. Use a leather repair kit with filler and colorant. Apply the filler, let it dry, then color match. Finish with a leather conditioner to restore softness and durability.
What Materials Do I Need To Fix Leather Seat Cracks?
You need leather cleaner, a repair kit with filler and colorant, sandpaper, and a soft cloth. Optionally, use a leather conditioner after repair to keep the seat supple and protected.
Can Diy Leather Repair Kits Fix Large Cracks Effectively?
DIY kits work best for small to medium cracks. Large cracks might need professional repair or replacement to restore strength and appearance properly. Attempting large repairs yourself may cause further damage.
How Long Does It Take To Fix A Cracked Leather Seat?
Repairing small cracks usually takes 30 to 60 minutes, excluding drying time. Larger repairs may take several hours due to multiple filler and drying layers. Patience ensures a better finish.
Conclusion
Fixing a crack in your leather car seat takes patience and care. Small cracks can become bigger if left alone. Use the right tools and follow each step carefully. A well-repaired seat looks better and lasts longer. Clean the area first to help the repair stick.
Regular maintenance keeps your leather soft and strong. Take your time to get good results. Your car will feel more comfortable and look neat. Simple fixes save money and avoid costly replacements. Give your leather seat the care it needs today.