
Are you looking to remove your car seats but don’t know where to start? Whether you want to clean deep, replace old seats, or upgrade your car’s interior, taking out your seats can seem tricky.
But don’t worry—you can do it yourself with the right steps. In this guide, you’ll learn simple, clear instructions to remove your car seats safely and quickly. Keep reading, and by the end, you’ll feel confident handling this task like a pro.
Tools Needed
Removing car seats requires the right tools. These tools help you work safely and efficiently. Using proper equipment reduces the risk of damage to your car or injury.
Some tools are common and easy to find. Others are made for specific car models or tasks. Knowing what you need saves time and effort.
Basic Hand Tools
Basic hand tools include items found in most toolkits. A ratchet and socket set is essential for loosening bolts. Screwdrivers, both flathead and Phillips, help remove screws. Pliers assist in gripping and pulling clips or connectors. A wrench set may be required for tight spaces. These tools cover most common seat removal jobs.
Specialized Equipment
Specialized equipment includes tools made for unique car designs. Torx drivers are needed for star-shaped bolts. Trim removal tools protect plastic panels from scratches. An impact driver can loosen stubborn bolts quickly. Sometimes, you may need a seat belt cutter or electrical connector tools. These items make tricky parts easier to handle.
Credit: www.youcanic.com
Preparing Your Car
Preparing your car before removing the seats is very important. It makes the process safer and easier. Taking the right steps helps avoid damage and injury. Start by creating space and ensuring power is off. These simple actions set the stage for smooth seat removal.
Clearing The Area
Remove all items from the car’s interior. Clear the floor, seats, and under the seats. Loose objects can block your work or cause injury. Also, fold down or move any parts that may get in the way. A clean workspace helps you focus on the task.
Disconnecting The Battery
Always disconnect the car battery before working on seats. This stops power to airbags and seat controls. Use a wrench to remove the negative terminal first. Wait a few minutes before starting to avoid electrical shocks. Safety is key when handling car electronics.
Removing Front Seats
Removing front seats is a key step in many car repairs or upgrades. It helps you access areas under the seat and inside the cabin. Front seats can be heavy and connected to wires. Careful handling is important to avoid damage or injury.
Follow these simple steps to remove your front seats safely and easily.
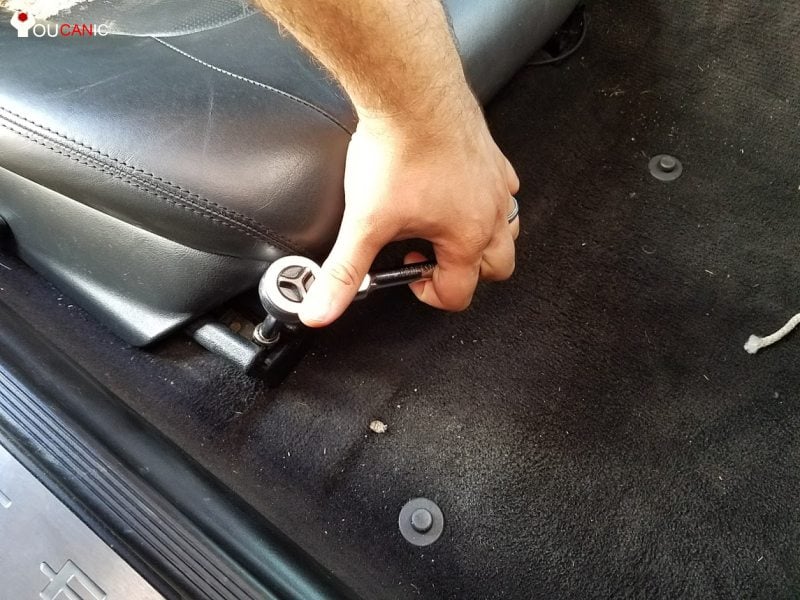
Locating Bolts And Screws
Start by moving the seat all the way forward and backward. This reveals the bolts holding the seat to the floor. Check under the seat and along the rails. Use a flashlight if needed to see clearly. Most bolts require a socket wrench to remove. Keep the bolts safe for reassembly.
Detaching Electrical Connectors
Modern front seats have electrical connectors for airbags and seat heaters. Gently slide the seat back to access these plugs. Press the release tabs and pull the connectors apart. Avoid pulling wires directly to prevent damage. Disconnect all connectors before lifting the seat out.
Lifting Out The Seat
Once bolts and connectors are removed, carefully lift the seat. Seats can be heavy and bulky. Ask for help if needed to avoid strain. Lift straight up to avoid scratching the car floor. Place the seat on a soft surface to protect it.
Removing Rear Seats
Removing rear seats from your car can open space for cargo or make cleaning easier. The process varies by car model but follows simple steps. Understanding these steps helps avoid damage and saves time. Below is a clear guide to remove rear seats safely and efficiently.
Folding And Unlatching
Start by folding the rear seat backs forward. Look for release levers or buttons near the seat base or sides. Pull these to unlock the seat backs. Folding the seats forward creates space to access bolts or clips. This step is crucial to make the next steps easier.
Removing Seat Cushions
Next, lift the seat cushions from the base. Most cushions snap into place with clips or bolts. Feel under the cushion for fasteners. Use a screwdriver or socket wrench to remove bolts. Carefully pull the cushion up and away from the car floor. Set the cushions aside in a safe place.
Taking Out The Seat Frame
With cushions removed, find the bolts holding the seat frame. These bolts are usually at the corners or along the edges. Use the correct tool to loosen and remove them. Keep the bolts safe for reinstallation. Lift the seat frame out carefully. It might be heavy or awkward, so ask for help if needed.
Handling Seat Belts And Airbags
Handling seat belts and airbags is important when removing car seats. These parts keep you safe during driving. Removing them carefully prevents damage and keeps safety features working. Follow clear steps to manage these components without stress.
Unfastening Seat Belt Anchors
Start by locating the seat belt anchors near the seat base. Use a wrench or socket to loosen the bolts holding the anchors. Pull the seat belt away gently while unfastening. Keep bolts safe for reinstallation. Avoid pulling hard on the belt to stop damage.
Dealing With Airbag Connectors
Find the airbag connectors under the seat or behind panels. Disconnect the car battery to avoid accidental airbag deployment. Press the release tab on each connector and pull it out carefully. Do not cut or force wires. Store connectors where they stay clean and dry.

Credit: www.youtube.com
Safety Tips
Removing car seats requires care to keep both the vehicle and yourself safe. Following safety tips helps avoid damage and injury. Taking simple precautions makes the process smooth and secure.
Avoiding Damage
Use the right tools to prevent scratches or dents. Keep bolts and screws in a safe place. Do not force parts to move. Handle seat belts and electrical connectors gently. Protect the car’s interior by placing a cloth or mat underneath.
Personal Safety Measures
Wear gloves to protect your hands from sharp edges. Use safety glasses to shield your eyes from dust and debris. Work in a well-lit area to see clearly. Keep children and pets away during removal. Lift heavy parts with your legs, not your back, to avoid injury.
Reinstalling Seats
Reinstalling car seats is an important step after removal. Doing it right ensures safety and comfort. Take your time and follow these steps carefully. Properly reinstalling seats keeps them stable and secure while driving.
Aligning And Securing Bolts
Place the seat back in its original position. Make sure the bolt holes line up perfectly. Use the correct bolts to avoid damage. Tighten bolts firmly but do not overtighten. Check that the seat does not move or wiggle. This step keeps the seat safely attached to the car floor.
Reconnecting Electrical Components
Locate the seat’s electrical connectors. These may power seat heaters, airbags, or sensors. Connect each plug carefully to its matching socket. Ensure the connectors click into place. Avoid forcing connectors to prevent damage. Test the electrical features before finishing. Proper reconnection keeps safety systems working well.

Credit: www.partsdocs.com
Frequently Asked Questions
How Do I Remove Car Seats Safely?
First, disconnect the car battery to avoid electrical issues. Then, unbolt the seat using proper tools. Carefully detach any wiring harnesses before lifting the seat out. Follow your vehicle’s manual for specific instructions to ensure safety and prevent damage.
What Tools Are Needed To Remove Car Seats?
You typically need a socket wrench, screwdriver, and sometimes pliers. A trim removal tool can help with clips and panels. Always check your car’s manual for the exact tools required, as different models may need specialized equipment.
Can I Remove Car Seats Without Damaging The Upholstery?
Yes, by using the right tools and techniques, you can avoid damage. Work slowly and carefully to prevent scratches or tears. Protect upholstery with cloth covers or blankets during removal. Following the vehicle manual’s guidance also helps maintain seat condition.
How Long Does It Take To Remove Car Seats?
Removing car seats usually takes between 20 to 45 minutes. Time depends on your experience, tools, and car model. Some vehicles have complex wiring or bolts, which may extend the process. Taking your time ensures safety and prevents damage.
Conclusion
Removing car seats can be simple with the right steps. Always check your car manual before starting. Take your time and work carefully. Use the proper tools to avoid damage. Keep bolts and screws safe for reassembly. Clean the area once the seat is out.
This helps keep your car fresh and tidy. Following these tips makes the job easier. Now, you can remove car seats with confidence. Ready to try it yourself?