
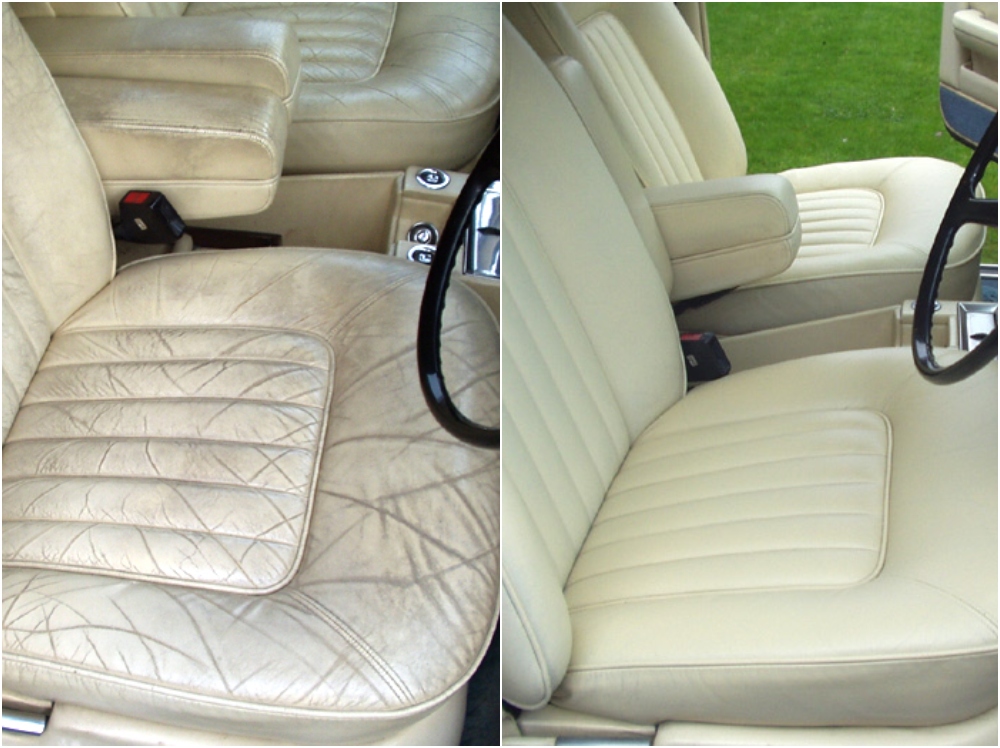
Are your leather car seats looking worn out, cracked, or faded? You don’t have to replace them to bring back that fresh, luxurious feel.
With the right steps, you can renovate your leather seats yourself and make your car interior look brand new again. Imagine sliding into a seat that feels smooth, looks rich, and adds value to your ride. In this guide, you’ll discover simple, effective tips that anyone can follow—even if you’re not a car expert.
Ready to transform your car seats and enjoy a more comfortable, stylish drive? Keep reading to learn how.
Tools And Materials Needed
Renovating leather car seats needs the right tools and materials. This ensures the job is done well and lasts long. Preparing these items before starting saves time and effort.
Each tool has a special role in cleaning, repairing, and protecting your leather seats. Using quality products helps keep the leather soft and fresh.
Cleaning Supplies
Start with gentle leather cleaner or mild soap. A soft cloth or sponge works best to avoid scratches. Use a brush with soft bristles for stubborn dirt. Clean seats remove oils and dirt that damage leather over time.
Repair Kits
Leather repair kits fix cracks, tears, and holes. They often include filler, adhesive, and color compounds. Choose a kit that matches your seat’s leather color. These kits help restore the seat’s smooth surface and look.
Leather Conditioner
Conditioner keeps leather soft and prevents drying. It nourishes the leather and stops cracks from forming. Apply conditioner evenly with a clean cloth. Conditioning regularly extends the life of your seats.
Protective Gear
Wear gloves to protect your hands from chemicals. Use a mask if working with strong fumes. Protective gear keeps you safe during the renovation process. Always work in a well-ventilated area for comfort and safety.
Preparing The Seats
Preparing your leather car seats is the first step in renovation. It helps to clean and protect the leather. Proper preparation makes the next steps easier and more effective.
Removing Dirt And Debris
Start by wiping the seats with a soft cloth. Use a damp cloth to lift dirt and dust. Avoid harsh scrubbing to protect the leather surface. This simple step clears the top layer of grime.
Vacuuming Crevices
Use a vacuum with a soft brush attachment. Focus on seams, cracks, and folds. Dirt collects in these small spaces. Removing debris prevents damage during cleaning and repair.
Testing Cleaner On Leather
Choose a cleaner made for leather seats. Test a small hidden spot first. Check for color change or damage after a few minutes. This step ensures the cleaner is safe to use on your seats.
Repairing Damage
Repairing damage is the first step to restoring leather car seats. Small cracks, tears, and holes can get worse if not fixed quickly. Proper repair helps keep the leather strong and looking good. It also prevents dirt and moisture from causing more harm. Follow these steps for simple, effective repairs.
Fixing Cracks And Tears
Start by cleaning the damaged area with a leather cleaner. Use a soft cloth to remove dirt and oils. For small cracks, apply a leather conditioner to soften the leather. For tears, use a leather repair kit. These kits often include adhesive and patches. Place the patch under the tear and press the edges down. Let the glue dry fully. This stops the tear from growing and makes the seat more durable.
Filling Holes
Holes need a filler made for leather. Clean the hole and its edges first. Use a spatula or a small tool to fill the hole with the leather filler. Apply in thin layers and let each layer dry before adding more. Build up until the hole is level with the rest of the seat. This helps the seat look smooth and even again. After drying, the area is ready for color matching and finishing.
Sanding And Smoothing
Once the filler dries, gently sand the area with fine-grit sandpaper. This removes bumps and rough spots. Sand lightly to avoid damaging the leather around the repair. After sanding, wipe away dust with a soft cloth. The surface should feel smooth and flat. This step prepares the seat for painting or dyeing. Smooth repairs blend better with the original leather.
Credit: www.furnitureclinic.ae
Cleaning The Leather
Cleaning leather car seats is the first step in any renovation project. Dirt, oils, and spills build up over time. This buildup can damage the leather if not removed properly. Proper cleaning prepares the surface for conditioning and repair. It helps maintain the leather’s look and feel. Follow these simple steps to clean your leather seats safely and effectively.
Choosing The Right Cleaner
Pick a cleaner made for leather only. Avoid harsh chemicals or household cleaners. These can dry out or discolor the leather. Look for pH-balanced, gentle leather cleaners. Test the cleaner on a small, hidden spot first. Check for any color change or damage. Using the right cleaner protects your seats during cleaning.
Applying Cleaner Properly
Use a soft cloth or sponge to apply the cleaner. Do not spray directly on the seat. Apply the cleaner in small sections. Work gently with circular motions. This lifts dirt without rubbing too hard. Avoid soaking the leather with too much liquid. Less is more when cleaning leather seats.
Wiping And Drying
After applying the cleaner, wipe off the residue. Use a clean, dry microfiber cloth. Wipe softly to remove dirt and cleaner. Do not leave the leather wet. Let the seats air dry in a cool place. Avoid direct sunlight or heat sources. Dry seats are ready for conditioning or repairs.
Conditioning And Moisturizing
Conditioning and moisturizing are key steps in renovating leather car seats. These steps help keep the leather soft and prevent it from cracking. Proper care also improves the look and feel of your seats. Regular conditioning extends the life of your leather.
Selecting A Conditioner
Choose a leather conditioner made for car seats. Avoid products with harsh chemicals. Look for natural oils or wax-based formulas. These nourish the leather without causing damage. Test the conditioner on a small area first to check for color changes.
Applying Conditioner Evenly
Use a soft cloth or sponge to apply the conditioner. Spread it in thin, even layers. Cover every inch of the leather surface. Avoid soaking the leather, which can cause stains. Gentle circular motions help the conditioner absorb better.
Allowing Leather To Absorb
Let the leather sit for at least 20 minutes after application. This time allows the conditioner to penetrate deeply. Do not wipe off the product immediately. After absorption, buff the seats lightly with a clean cloth. This step removes any excess conditioner and shines the leather.

Credit: www.leathercare.com
Recoloring And Dyeing
Recoloring and dyeing leather car seats refreshes their look and hides wear. This process restores the original color or changes it to a new shade. It requires patience and the right materials for a smooth finish.
Matching Leather Color
Start by finding the exact color of your leather seats. Use small samples or photos for comparison. Test the dye on a hidden area to check the match. Correct color matching keeps the seats looking natural and uniform.
Applying Dye In Layers
Apply the dye in thin, even layers. Let each layer dry before adding the next one. Multiple layers build depth and prevent streaks. Use a sponge or cloth for smooth application.
Sealing The Color
After dyeing, seal the color with a leather finish or protector. This step locks in the dye and adds shine. Sealing also protects the leather from spills and fading. Allow the sealant to dry completely before use.
Finishing Touches
Finishing touches are key to making leather car seats look fresh and new. These steps protect your work and help the seats last longer. A smooth, clean finish gives the seats a nice shine and keeps them soft. Follow these simple steps to complete your leather seat renovation perfectly.
Buffing The Surface
Buffing smooths the leather and removes excess product. Use a soft cloth or a foam pad for best results. Move in small, circular motions gently across the surface. This step brings out a natural shine and evens out the color. Avoid pressing too hard to prevent damage.
Applying Protective Coating
Protective coating shields leather from dirt and spills. Choose a leather sealant or conditioner with UV protection. Apply a thin, even layer using a clean cloth. Let it dry completely before using the car. This coating helps keep the leather soft and prevents cracks.
Regular Maintenance Tips
Keep leather seats clean by wiping them weekly with a damp cloth. Use a leather cleaner every few months to remove dirt buildup. Avoid harsh chemicals that can dry out the leather. Condition the seats regularly to maintain softness and shine. Protect seats from direct sunlight to reduce fading.

Credit: www.furnitureclinic.co.uk
Frequently Asked Questions
How Do I Clean Leather Car Seats Before Renovating?
Start by vacuuming dirt and debris gently. Use a leather cleaner with a soft cloth. Avoid harsh chemicals to prevent damage. Cleaning ensures better adhesion of repair products and improves the final look.
What Materials Are Needed To Renovate Leather Car Seats?
You need leather cleaner, conditioner, repair kit, sandpaper, and dye. Also, prepare soft cloths, applicator sponges, and protective gloves. Using proper materials guarantees a smooth and lasting renovation.
Can I Repair Cracks And Tears In Leather Seats Myself?
Yes, small cracks and tears can be fixed at home. Use a leather repair kit with filler and adhesive. Follow instructions carefully for best results and avoid further damage.
How Often Should I Condition Leather Car Seats?
Condition leather seats every 3 to 6 months to keep them soft. Conditioning prevents drying and cracking, extending the seat’s lifespan. Regular care maintains the leather’s natural look and feel.
Conclusion
Renovating leather car seats can bring new life to your vehicle. Small steps like cleaning, repairing, and conditioning make a big difference. These tasks protect the leather and keep it soft. Regular care helps seats look fresh for years. Taking your time ensures better results and saves money.
Enjoy the comfort and style of well-kept leather seats. Your car will feel more inviting and look nicer too. Simple care routines make a lasting impact on your ride. Give your leather seats the attention they deserve today.