
Are your leather car seats starting to crack and lose their smooth look? It can be frustrating to see your car’s interior wear down, especially when those cracks make your seats uncomfortable and less attractive.
But here’s the good news—you don’t have to replace your seats or spend a fortune on professional repairs. With the right steps, you can bring your leather back to life and protect it from further damage. In this guide, you’ll discover simple, effective ways to repair cracking leather car seats and keep your car looking its best.
Keep reading to learn how to restore your seats quickly and easily.
Credit: www.youtube.com
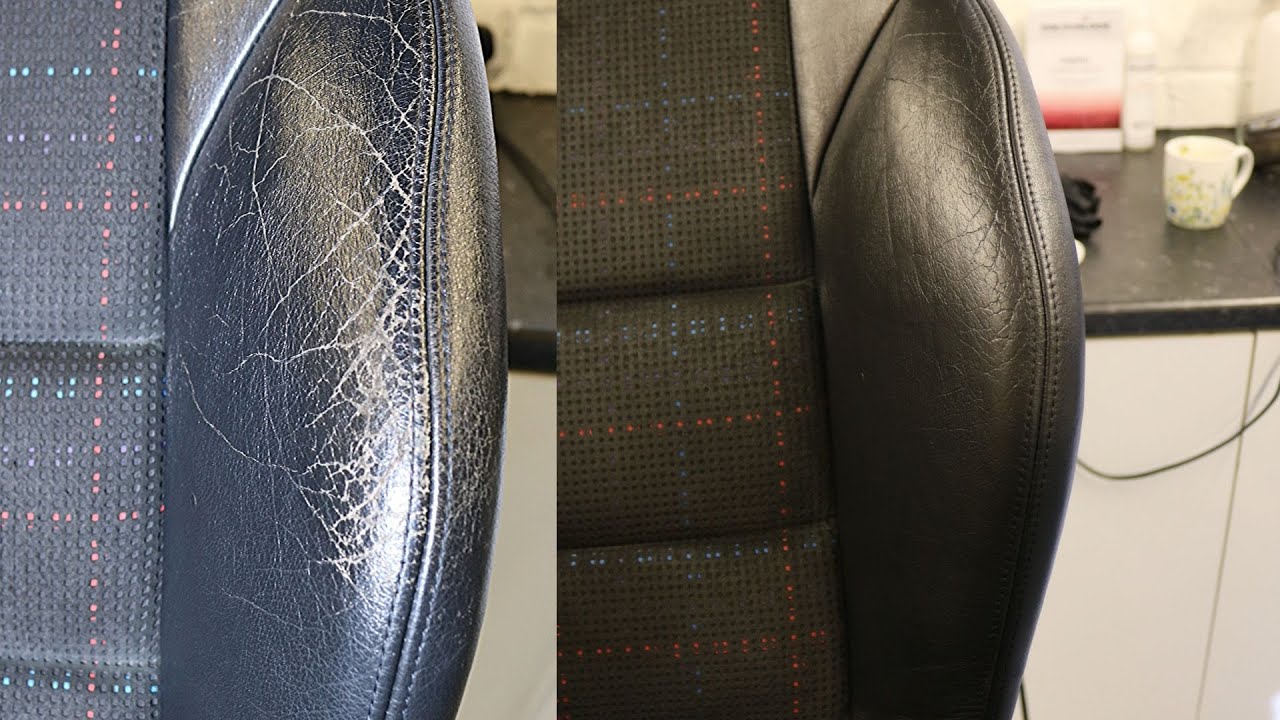
Causes Of Leather Cracking
Leather car seats look great but can crack over time. Cracking happens because of several common causes. Understanding these causes helps you protect and repair your leather seats effectively.
Effects Of Sun Exposure
Sunlight damages leather by drying it out. UV rays break down leather fibers. This causes the leather to fade and become brittle. Long sun exposure makes cracks appear faster. Keeping seats shaded can prevent this damage.
Impact Of Dryness
Leather needs moisture to stay soft and flexible. Dry air removes natural oils from leather. Without oils, the leather dries and hardens. This leads to small cracks and rough texture. Regular conditioning keeps leather hydrated and smooth.
Wear And Tear Factors
Daily use causes rubbing and pressure on seats. This wears down the leather surface over time. Sharp objects like keys can scratch and tear leather. Sitting and moving causes stress on seams and corners. Gentle care reduces damage from wear and tear.
Tools And Materials Needed
Repairing cracked leather car seats needs the right tools. Using proper supplies makes the job easier. It also helps the repair last longer. Gather all materials before you start.
Cleaning Supplies
Clean seats before fixing cracks. Use a soft cloth or sponge. Mild soap works well to remove dirt. Avoid harsh chemicals that damage leather. Let the leather dry completely after cleaning.
Leather Repair Kits
Leather repair kits include patch compounds and fillers. Choose a kit that matches your seat color. These kits come with easy instructions. Some have small tools for smooth application. Use them carefully for best results.
Conditioners And Sealants
Apply conditioner to keep leather soft. It stops further cracking and drying. Sealants protect the repaired area. They lock in color and moisture. Use a soft cloth to apply evenly.
Preparing The Seat For Repair
Preparing the leather seat for repair is an important first step. The better you prepare, the stronger the repair will be. This process removes dirt, old finishes, and smooths out cracks. It creates a clean, even surface for the repair materials to stick to. Follow each step carefully to get the best results.
Cleaning The Leather Surface
Start by cleaning the seat to remove all dirt and oils. Use a gentle leather cleaner and a soft cloth. Wipe the entire area around the cracks. Make sure no dust or grease remains on the leather. This helps the repair products bond well with the surface.
Removing Old Finish
Old finishes can block repair materials from sticking properly. Use a leather prep product or rubbing alcohol to remove the finish. Apply it lightly with a clean cloth and rub gently. This step opens up the leather pores for better adhesion.
Sanding The Cracks
Lightly sanding the cracked areas smooths rough edges. Use fine-grit sandpaper and sand in small circles. Be careful not to damage the leather further. This helps the repair filler stick inside the cracks and creates a smooth finish.

Credit: www.youtube.com
Filling And Repairing Cracks
Filling and repairing cracks is the key step to restore leather car seats. It makes the leather smooth and strong again. This process stops cracks from growing larger. It also improves the seat’s look quickly. The right products and careful work will bring good results.
Applying Leather Filler
Start by cleaning the cracked area well. Use a soft cloth and leather cleaner. Let it dry completely before applying filler. Take a small amount of leather filler on a spatula or finger. Gently press it into the cracks. Fill each crack fully for best results. Avoid using too much filler at once. It may create lumps on the surface.
Smoothing The Surface
After filling, smooth the surface with a plastic spatula. Use light, even strokes to level the filler. Make sure the cracks disappear under the filler. Remove any excess filler around the cracks. This step helps the repair blend with the rest of the seat. For a perfect finish, repeat filling and smoothing if needed.
Drying Time And Tips
Allow the filler to dry for at least 2 hours. Avoid touching or sitting on the seat during this time. Place the car in a dry, well-ventilated area. Heat or sunlight can speed up drying but avoid direct sun. Once dry, gently sand the area with fine sandpaper. This makes the surface even smoother before coloring or sealing.
Color Matching And Dyeing
Color matching and dyeing are key steps in fixing cracked leather car seats. Matching the color perfectly helps the repair blend with the rest of the seat. Dyeing restores the seat’s original look and hides cracks or worn areas. This process needs patience and care for the best results.
Choosing The Right Dye
Select a dye made specifically for leather seats. Look for colors close to your seat’s shade. Test the dye on a hidden spot first. This prevents surprises and color mistakes. Water-based dyes are safer and easier to use for beginners.
Applying Leather Dye
Clean the seat surface before applying dye. Use a soft cloth or sponge for smooth application. Apply thin layers of dye evenly across the cracked area. Let each layer dry completely before adding the next. Avoid soaking the leather to prevent damage.
Layering For Even Color
Build color slowly by adding multiple thin layers. This helps the dye soak in uniformly. Watch for streaks or dark spots and smooth them out. Patience during layering improves the final look. Finish with a protective leather conditioner to seal the color.
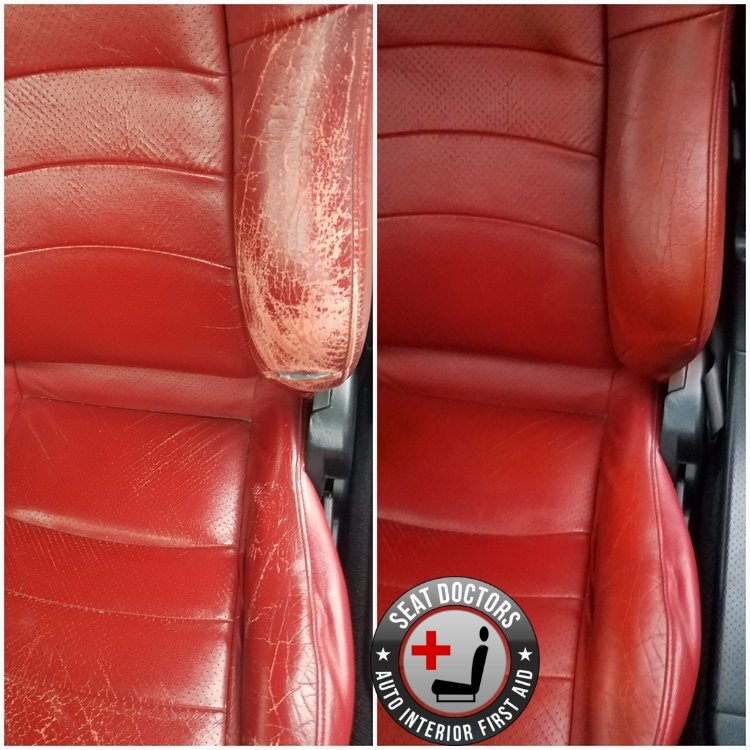
Credit: www.seatdoctors.com
Conditioning And Sealing
Conditioning and sealing are key steps to fix cracking leather car seats. They restore moisture and protect leather from further damage. Proper care keeps seats soft and strong over time.
Leather naturally loses oils and dries out. Conditioning replaces these oils to prevent cracks. Sealing locks in moisture and shields leather from dirt and spills.
Using Leather Conditioner
Choose a conditioner made for car leather. Test it on a small area first. Apply a thin layer with a soft cloth. Rub gently in circular motions. Let it soak for 15 minutes. Wipe off any extra product. Repeat every 3 months to keep leather nourished.
Applying Protective Sealant
Sealant creates a barrier on the leather surface. It stops dirt and water from soaking in. Use a soft cloth to spread sealant evenly. Cover the entire seat, including edges and seams. Allow it to dry fully before use. Apply sealant twice a year for best protection.
Maintaining Softness And Flexibility
Conditioning keeps leather soft and flexible. Avoid harsh cleaners that strip oils. Clean spills quickly with a damp cloth. Avoid direct sunlight and extreme heat. Regular care helps leather stay smooth and crack-free longer.
Preventing Future Cracks
Preventing future cracks in leather car seats helps keep them soft and strong. Taking simple steps protects your investment and keeps your car looking good. Healthy leather lasts longer and feels better to sit on.
Start with good care habits. Small actions every day make a big difference over time.
Regular Cleaning Routine
Clean your leather seats often to remove dirt and oils. Use a soft cloth and mild cleaner made for leather. Avoid harsh chemicals that dry out the leather. Wipe gently to keep the surface smooth. Clean seats stay soft and resist cracking.
Protecting From Sun Damage
Sunlight dries out leather and causes cracks. Park in shaded areas or use a sunshade in the windshield. Tinting windows can block harmful UV rays. Cover seats if you leave your car in the sun for hours. Cooler seats last longer without damage.
Using Seat Covers
Seat covers protect leather from wear and spills. Choose covers made for leather seats to avoid friction damage. Covers also reduce dirt buildup. Remove and clean covers regularly to keep seats fresh. A good cover adds an extra layer of defense.
Frequently Asked Questions
How Can I Fix Small Cracks In Leather Car Seats?
Small cracks can be fixed using a leather repair kit. Clean the seat, apply filler, and color match carefully. Finish with a leather conditioner for durability and shine.
What Causes Leather Car Seats To Crack?
Leather seats crack due to sun exposure, heat, dryness, and lack of maintenance. Regular conditioning prevents drying and cracking. Avoid harsh cleaners that damage leather fibers.
Can I Repair Cracked Leather Seats Myself?
Yes, DIY repair kits are available for cracked leather. Follow instructions carefully for cleaning, filling, and coloring. Professional help is best for severe damage or large cracks.
How Do I Prevent Leather Seats From Cracking?
Prevent cracking by regularly cleaning and conditioning leather seats. Use sunshades to reduce UV exposure. Avoid harsh chemicals and promptly clean spills to maintain leather softness.
Conclusion
Fixing cracked leather car seats helps keep your car looking nice. Small cracks can turn into big problems if ignored. Clean and condition the leather regularly to avoid damage. Use simple repair kits to save money and time. Taking care of your seats adds comfort and value.
Keep your car interior fresh and inviting. Start repairs early for the best results. Your car deserves some attention to stay in great shape.