
Your leather car seats are more than just a place to sit—they add style and comfort to your ride. But cracks can quickly ruin that look and make your seats feel worn out.
If you’ve noticed those ugly cracks spreading, don’t worry. You can fix them yourself and bring back that smooth, fresh appearance without spending a fortune. In this guide, you’ll discover simple, effective steps to repair your leather car seats and protect them from future damage.
Keep reading, and you’ll have your seats looking like new in no time.

Credit: mechanics.stackexchange.com
Identify The Damage
Identifying the damage is the first step in repairing leather car seats with cracks. This step helps you understand how bad the cracks are and what kind of repair is needed. You must closely look at the leather to spot all cracks and any other issues. Proper identification saves time and ensures the right materials and tools are used for repair.
Assessing Crack Severity
Start by examining the size and depth of each crack. Small, shallow cracks can often be fixed with simple filler or conditioner. Deep or wide cracks may need patching or professional help. Check if the cracks are spreading or if they are isolated. This helps decide if a quick fix or a full restoration is necessary. Note any peeling or flaking around the cracks.
Spotting Underlying Issues
Look beyond the cracks for other problems. Check if the leather feels dry or brittle. This condition often causes cracks to worsen over time. Inspect the stitching and seat foam for damage too. Moisture damage or mold can hide under cracks, making repair harder. Recognizing these issues early improves repair success and seat longevity.
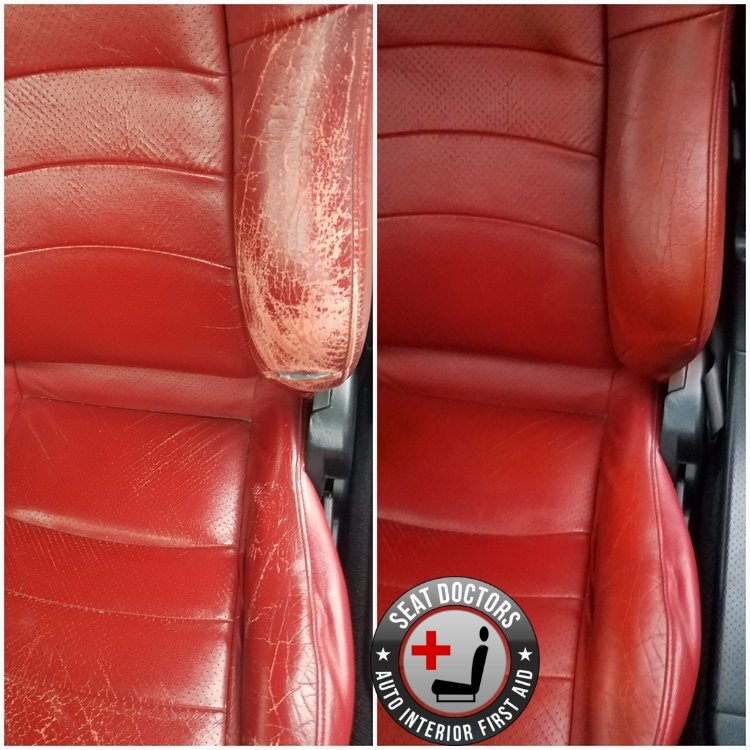
Credit: www.seatdoctors.com
Gather Repair Materials
Gathering the right materials is the first step to repair cracked leather car seats. Having everything ready saves time and avoids frustration during the repair. The proper tools and repair kit make the job easier and improve results.
Focus on quality materials. Cheap or wrong items can worsen the damage or leave poor finishes. Prepare your workspace and keep all materials within reach before starting the repair.
Essential Tools
Start with basic tools for leather repair. You will need a soft cloth to clean the seat. Sandpaper or a fine abrasive pad helps smooth rough edges. A palette knife or plastic spreader is useful for applying filler. Use gloves to protect your hands from chemicals. Have a small container of water or alcohol to clean the repair area. Good lighting is important to see cracks clearly.
Choosing The Right Leather Repair Kit
Pick a repair kit designed for automotive leather. It should include filler, adhesive, and color compounds. Match the color of your car seat leather for a natural look. Check the kit instructions to ensure ease of use. Avoid kits with harsh chemicals that can damage leather further. Read reviews to find reliable brands. A well-chosen kit boosts confidence and improves the final repair quality.
Clean The Leather Surface
Cleaning the leather surface is the first step to fix cracks in car seats. Dirt and oils can block repair materials from sticking well. A clean surface helps the repair last longer and look better.
Removing Dirt And Oils
Use a soft cloth to wipe the leather gently. Choose a cleaner made for leather, not harsh chemicals. Apply the cleaner lightly and rub in small circles. This removes dust, dirt, and body oils. Avoid soaking the leather; use only a little cleaner. Let the seat dry completely before the next step.
Preparing For Repair
Check the seat for loose leather flakes or peeling. Use a fine sandpaper to smooth rough edges carefully. Wipe the seat again with a damp cloth to remove dust. Allow the leather to dry fully. This prepares the surface to bond well with repair products.
Apply Leather Filler
Applying leather filler is a key step to fix cracks on car seats. It helps fill gaps and restores the smooth look of the leather. This process makes the seat stronger and prevents cracks from growing bigger. Follow the steps carefully for the best results.
Filling Deep Cracks
Start by cleaning the cracked area well. Remove any dirt or loose leather pieces. Use a small spatula to apply leather filler into the deep cracks. Press the filler firmly so it fills all gaps. Avoid putting too much at once. Let it dry for about 20 minutes. Repeat filling if the crack is still visible.
Smoothing The Surface
After the filler dries, use fine sandpaper to smooth the surface. Sand gently to avoid damaging the leather. The goal is a flat, even surface that blends with the seat. Wipe off dust with a soft cloth. This step prepares the seat for color matching or finishing. A smooth surface makes the repair less visible and lasts longer.
Sand And Smooth Repair Area
Sand and smooth the cracked area before applying any filler or dye. This step removes rough edges and helps the repair material stick better. Proper sanding creates a clean surface, making the repair look natural and lasting longer. Take your time here. A smooth base means a smooth finish.
Choosing The Right Sandpaper
Use fine-grit sandpaper for leather repairs. Start with 400-grit to gently smooth the cracks. Avoid rough sandpaper. It can damage the leather further. After 400-grit, use 600 or 800-grit to refine the surface. The goal is a soft, even texture without scratches. Always sand lightly and evenly.
Achieving A Seamless Finish
After sanding, wipe the area with a damp cloth. This removes dust and debris. Check for any uneven spots. Sand again lightly if needed. The leather should feel smooth and flat. The repair will blend better with the rest of the seat. A seamless finish makes cracks nearly invisible. Take care to keep the edges smooth and gentle.
Color Match And Dye
Color matching and dyeing are key steps in fixing cracked leather car seats. These steps restore the seat’s look and make cracks less visible. Proper color matching keeps the repair natural and smooth. Dyeing adds new life to worn areas and blends the repair with the rest of the seat.
Selecting The Perfect Shade
Choose a leather dye that matches your seat color closely. Many brands offer sample kits to test shades first. Compare the dye color on a small hidden spot. Let it dry completely before deciding. Pick a shade slightly lighter if unsure. Leather darkens a little after dyeing.
Applying Leather Dye
Clean the cracked area before applying dye. Use a soft cloth to apply dye evenly. Dab gently rather than rubbing hard. Apply thin layers for better control. Let each layer dry fully before adding more. Avoid soaking the leather to prevent damage. Finish by blending edges softly into the seat.
Protect And Condition Leather
Protecting and conditioning leather is key to fixing cracks in car seats. It helps keep the leather soft and strong. Well-maintained leather lasts longer and looks better. Regular care stops small cracks from turning into big problems. Taking time to protect and condition your seats saves money on repairs later.
Using Leather Conditioner
Leather conditioner adds moisture back to dry seats. It softens the leather and stops cracks from spreading. Apply conditioner with a soft cloth. Rub it gently into the leather in small circles. Let the conditioner soak in for at least 20 minutes. Wipe off any extra with a clean cloth. Use conditioner every few months for best results.
Preventing Future Damage
Keep leather seats safe by avoiding harsh sunlight. Park in shaded areas or use sunshades. Clean spills quickly to stop stains and damage. Avoid sharp objects that can scratch the leather. Use seat covers if you carry pets or heavy tools. Regular cleaning and conditioning keep leather flexible and strong. This reduces the chance of new cracks forming.
Tips For Long-lasting Repairs
Repairing cracked leather car seats takes effort. Good repairs last longer and look better. Use simple tips to keep your leather strong. These tips help avoid new damage and keep seats smooth.
Regular Maintenance
Clean your leather seats often with a soft cloth. Use a leather cleaner made for car seats. Do not use harsh chemicals that dry the leather. Apply a leather conditioner every few months. This keeps the leather soft and stops cracks. Keep your car out of direct sunlight when possible. Sunlight makes leather dry and weak. Use seat covers if your car stays in the sun a lot.
Avoiding Common Mistakes
Do not use too much water on leather. Water can cause stains and damage. Avoid using household cleaners like bleach or ammonia. These harm leather and make cracks worse. Do not ignore small cracks or damage. Fix them early before they get bigger. Avoid sharp objects near your seats to stop new tears. Be gentle when cleaning or repairing to keep leather safe.

Credit: www.youtube.com
Frequently Asked Questions
How Do I Fix Small Cracks In Leather Car Seats?
Clean the seat thoroughly first. Use a leather filler to fill cracks. Allow it to dry, then sand lightly. Finish with leather dye matching your seat color for a smooth look.
What Materials Are Needed To Repair Cracked Leather Seats?
You need leather cleaner, filler, sandpaper, leather dye, and a sealant. Optional tools include a sponge, applicator, and gloves. These materials help restore the seat’s appearance effectively.
Can I Repair Leather Car Seats Without Professional Help?
Yes, many leather repairs are DIY-friendly. Follow step-by-step guides carefully. Use quality products to ensure lasting results. However, deep cracks may require professional attention for best outcomes.
How Long Does Leather Seat Repair Usually Take?
Most minor repairs take 1 to 3 hours. Drying time for fillers and dyes varies. Plan accordingly to allow proper curing for durable results.
Conclusion
Repairing cracked leather car seats takes patience and care. Small cracks can become bigger if ignored. Using the right tools helps restore the seat’s look. Clean the area first, then apply leather repair products gently. Regular maintenance keeps leather soft and strong longer.
You can save money by fixing cracks yourself. Enjoy your car’s fresh, smooth seats again. Simple steps make a big difference in leather care. Try these tips and see the results for yourself.